Sign In Settings
The Sign In Settings tab provides a number of options which helps the administrators define the user experience during Single Sign On (SSO).
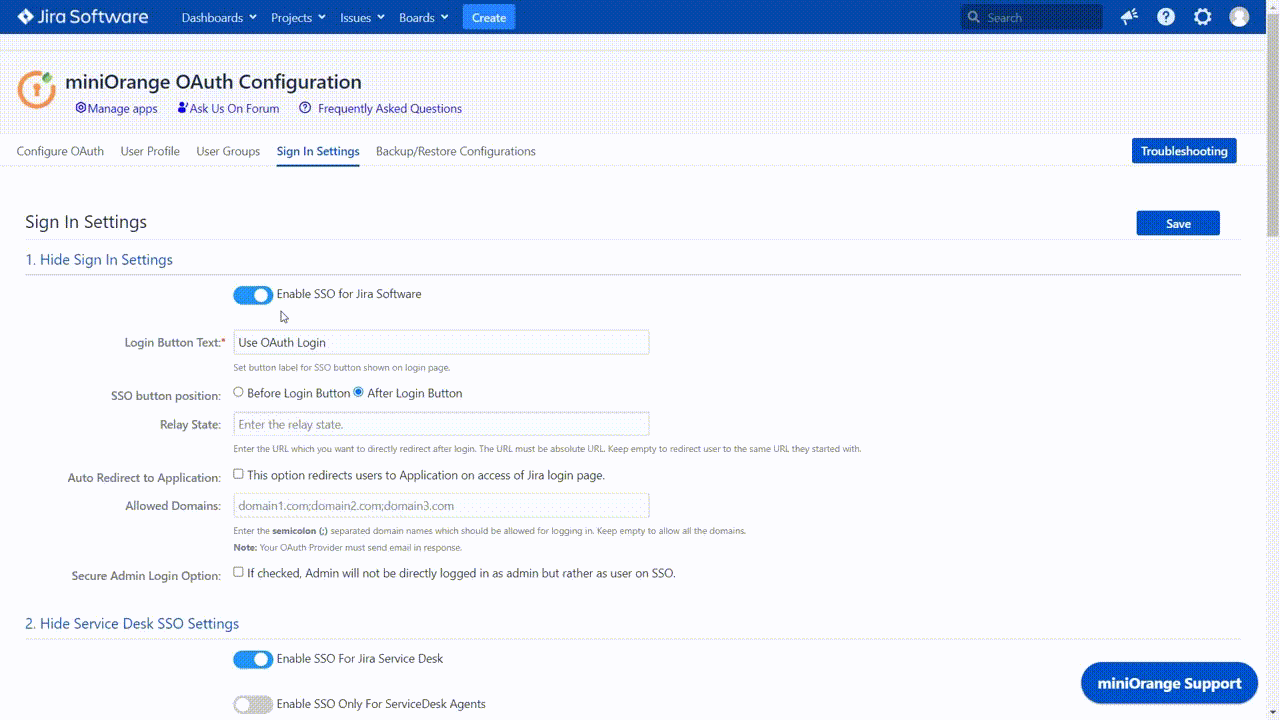
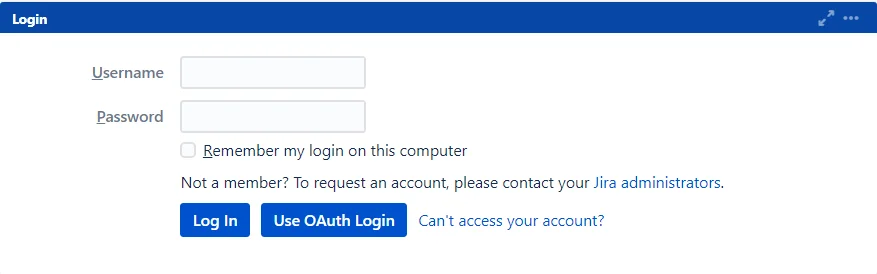
Login Button
Login Button Text
The app adds a SSO button to your login page. After clicking on this button, the app will redirect users to OAuth/OpenID Provider for SSO. The text entered in this field will be the title of the button. The default title is ‘Use Oauth Login’.
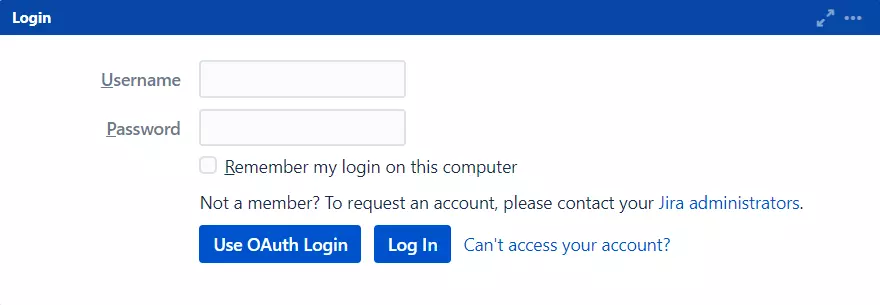
SSO Button Position
SSO button’s position can be altered based on the preference of the administrator. It can be placed before or after the default login button.
Relay State URL
All users will be redirected to this URL after successful SSO. For example, consider you want to redirect all your users to the https://example.miniorange.com then you need to specify this URL here. After every successful SSO, the user will be redirected to the page on the basis of the URL specified. Relative URLs are not supported in this feature, only absolute URLs are accepted.
If the URL is left blank then the user will be redirected to the same page he started with before initiating SSO.
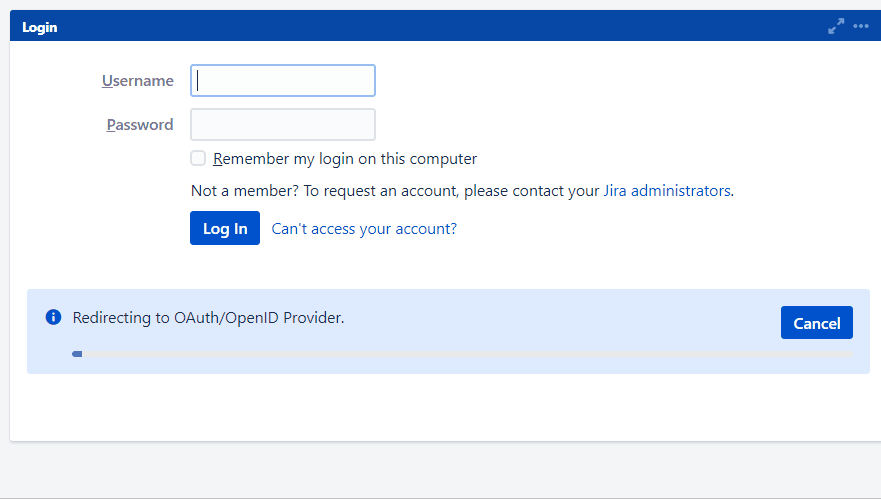
Auto Redirect to Application
On enabling this option, all unauthenticated users are automatically redirected to the OAuth Provider login page and don’t have access to the Atlassian login page. Enable this option if you want to force the authentication of all the users to be done through SSO and not allow the users to use the default login page.
Let us consider Keycloak as OpenID provider, when the user triers to access the login page of the application he will be redirected to the Keycloak login page, and after successful login he will be redirected to the page he started with.
Enabling this option will show you some sub options as given in the image below.
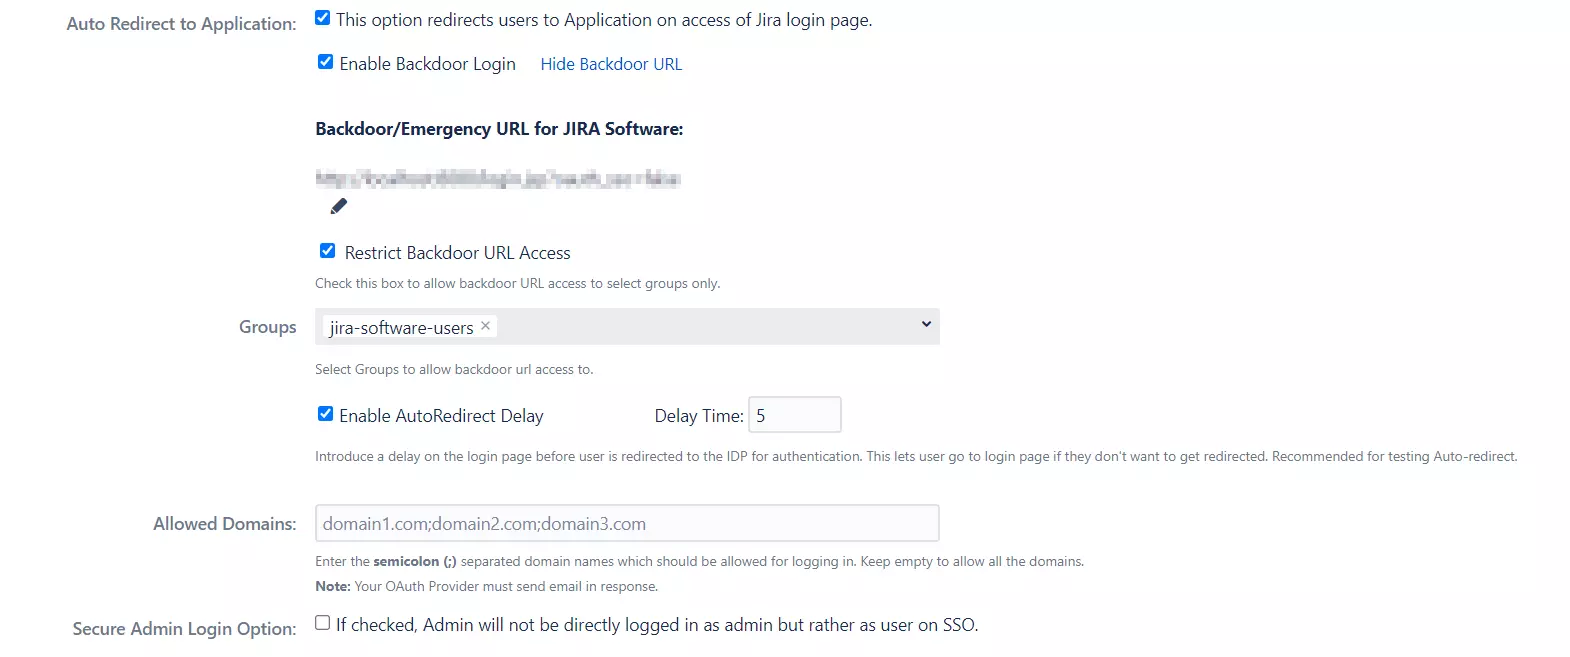
Backdoor/Emergency URL
The Backdoor URL allows users to access the login page of the application without being redirected to Provider, i.e., entering this URL in browser will show you the login page and you can enter your username and password to log in. You can also edit the Backdoor URL to create your own. This is recommended for troubleshooting purpose.
If Auto-redirect is enabled, all users are forced to use SSO, even administrators. Now if in any case, SSO doesn’t work or Provider is not accessible, the administrators will need a way to log into the application to troubleshoot the issue. So to access the application, they need to log in with their local credentials.
Please copy and note down the Backdoor URL in a safe location.
-
Restrict Backdoor URL:
Backdoor URL allows you to login with your application credentials and bypass SSO and in some organizations, only administrators or a particular group of users should be allowed to bypass SSO. Enabling this option secures your backdoor URL by allowing only particular groups to access it.
-
Backdoor Groups:
Group(s) of the user allows to access Backdoor URL. For example, jira-administrator, in this case only JIRA Administrators will be able to access the JIRA login page and any user who is not JIRA Administrator will be redirected to Provider.
-
Enable Auto-Redirect Delay
Introduces a delay on the login page before the user gets redirected to the provider for authentication. So a user will see a progress bar on the login page which gives him a 5 seconds window to cancel redirection to provider.
Recommended if you have a different sets of users, some of whom are using SSO and others are using local login. It can also be used for testing Auto-redirect to application functionality.
Allowed Domains
This option allows you to specify the email domains that will be allowed to perform SSO into the application. During SSO, the domain name of a user is extracted from their email and if this domain is among the allowed domains only then he is allowed to login. Please note, if all domains are to be allowed then keep this option empty.
Use this functionality if you want to restrict SSO based on the email domains of the users.
Let’s consider the example where you only want to allow users with the domain as miniorange.com to login. Then you need to specify the domain name here as miniorange.com, and the user with an email as abc@miniorange.com will only log in with all other users restricted.
Secure Admin Login Option**
If enabled admins will be logged in without their admin privileges after Single Sign On (SSO). Users need to authenticate again to access admin settings or perform any admin operations. This helps to add an extra layer of security for admin privileges.
Service Desk SSO Settings*
Provides an option to enable/disable OAuth SSO on the customer portal. This feature is specific to the JIRA OAuth SSO app.
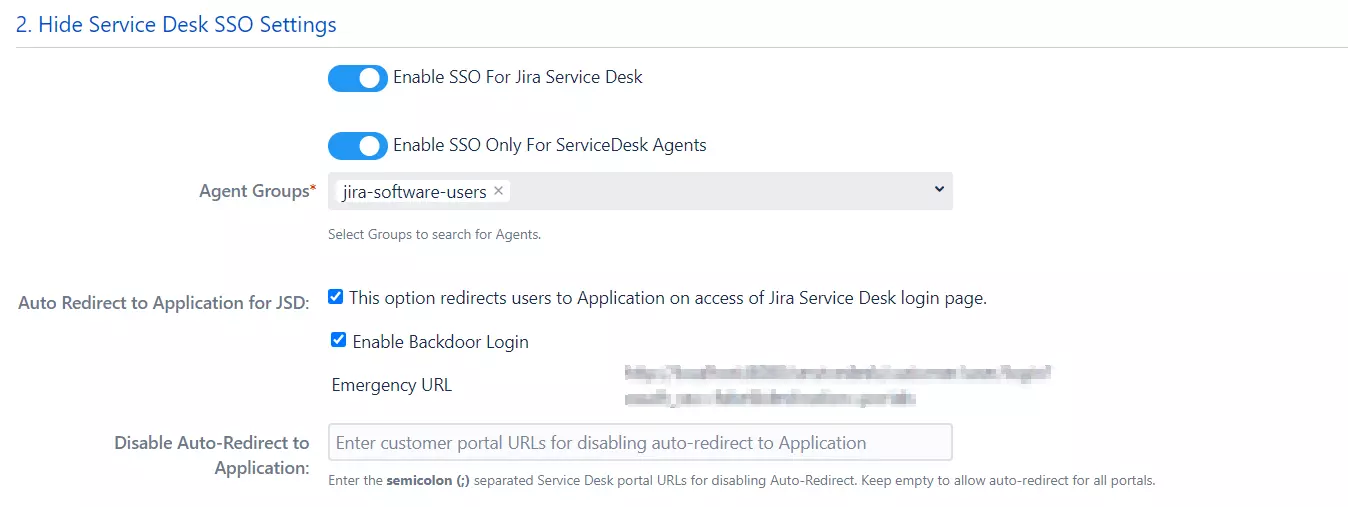
Enable SSO For Service Desk
Enabling SSO for Jira Service Desk will allow all the users from the service desk customer portal to perform SSO. Enable this only when all the users from the service desk are able to perform SSO. If your application is used only by customers & they are not a part of your OAuth Provider, disable this feature so they can log in with their default application credentials.
Enable SSO Only For Service Desk Agents
Enabling SSO for Jira Service Desk Agents will allow users belonging to particular group to perform SSO. Administrators can configure multiple groups to which they want to enable SSO for. So the users which are not part of the configured groups will have to log in with their default application credentials.
Auto Redirect to OAuth Provider/ OpenID Connect
This option redirects the users directly to the OAuth Provider/ OpenID Connect on accessing the JIRA Service Desk login page. Enable this if you want to restrict users from accessing the default login page.
- Enable Backdoor Login:
If the backdoor login is enabled, then the Emergency URL can be used for logging in when you are not being able to login with your OAuth provider. This feature is used when you enable auto redirect to OAuth Provider/ OpenID Connect but you are not able to login, for instance, you get locked out of your Atlassian application, then this URL will redirect you to the Default Login Page.
Disable Auto Redirect to OAuth Provider/ OpenID Connect
Here you can specify the URL of the portal whose users you don’t want to get auto redirect to Provider. If this field is left empty users from all the JIRA service desk portals will be redirected to OAuth/OIDC Provider.
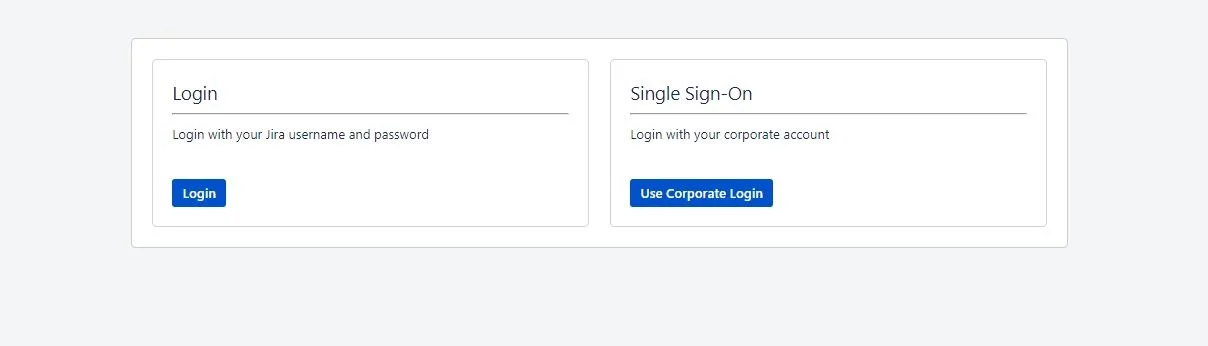
Custom Login Template
Custom Login Template for Jira Software

This is default template for Single IdP setup but you can customize it according to your need or you can design your own SSO login template.
URL to access Default Login Page for Jira Software

Use this option to access Jira default login page when custom login template is turned on.
Custom Login Template for Customer Portal(Jira ServiceDesk)

This is default template for Single IdP setup but you can customize it according to your need or you can design your own SSO login template.
URL to access Default Customer Portal Login Page
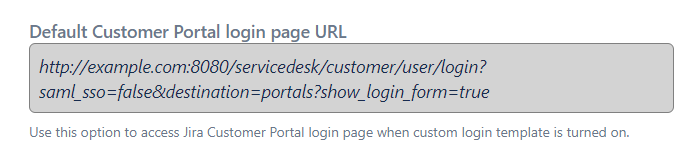
Use this option to access Jira Customer Portal login page when custom login template is turned on.
Code for Adding a new SSO Button

Custom Login Template
This template defines the UI of the dashboard and login page. The template is written in HTML. You can add more SSO buttons( In case of multiple IdP configuration) using IdPID.
Sign Out Settings
The Sign Out Settings section contains Custom Logout URL, Custom Logout Template, Custom Error Message Template. If this is configured, it redirects the user to the specified URL when the user logs out or else the user is redirected to the default logout page or if the error is caught at SSO user will be redirected to the error message page.
Custom Logout URL
An absolute URL where a user will be redirected after logout. If you already have a predefined logout page you can define the URL in Custom Logout URL and the user will be redirected to it after logging out.
Custom Logout Template
The template will be shown to the user after logout. Admin can customize this template according to his needs. The Base URL link can be provided here so the user can log in again.
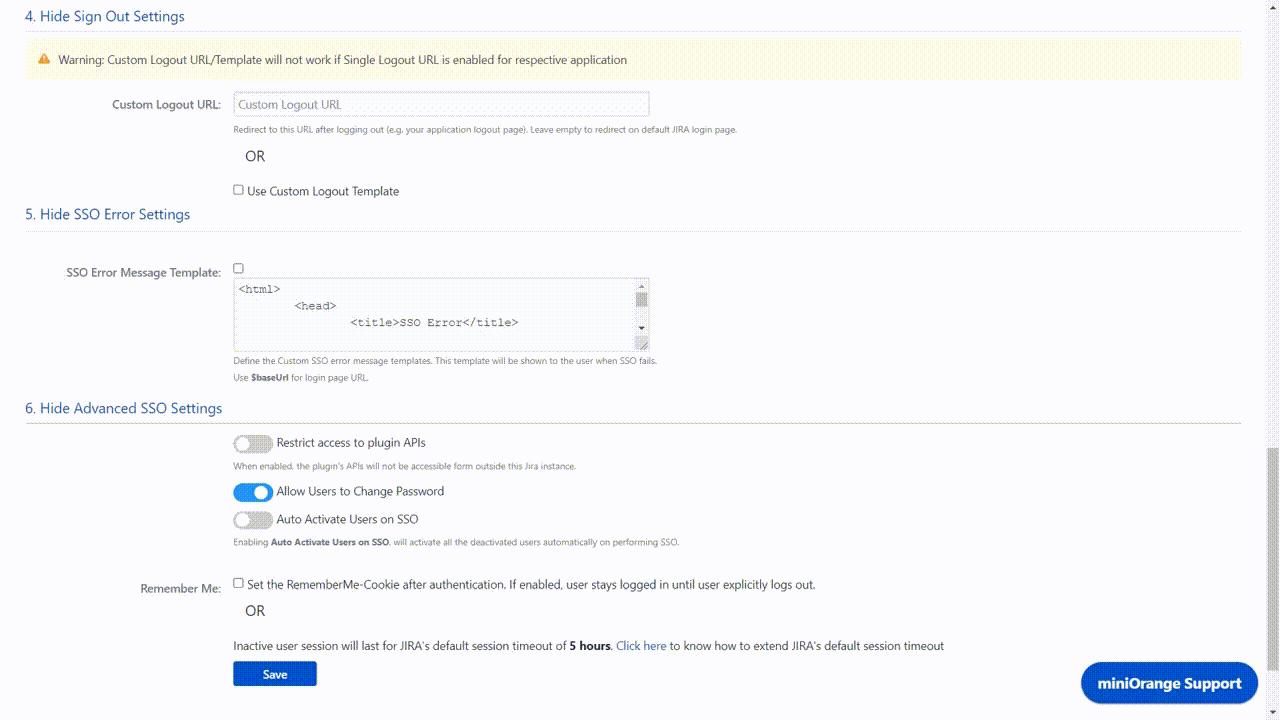
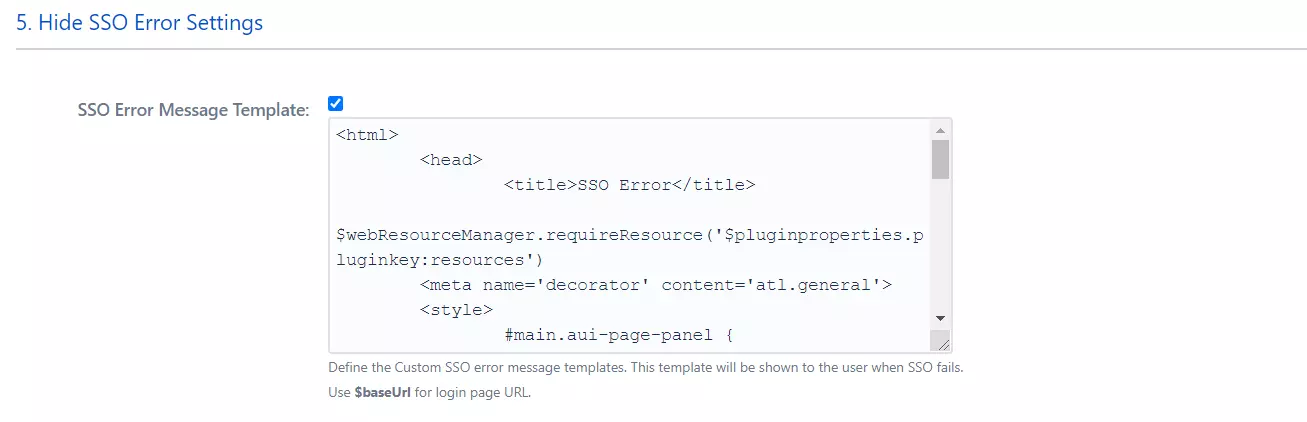
SSO Error Settings**
Error Message Template
The user will be redirected to this page if any error occurs at the time of SSO. Admin can customize this template according to his needs.
Advanced SSO Settings**
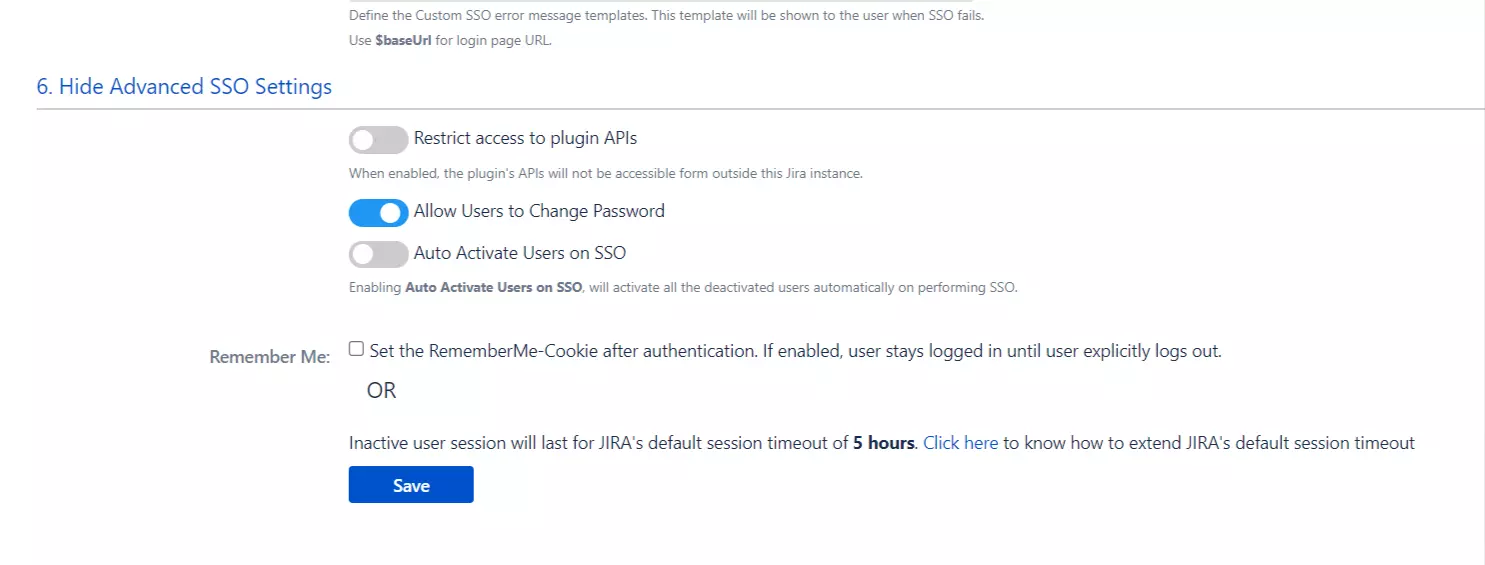
Restrict access to plugin API
This option restricts plugin’s API to the instance only. Users won’t be able to access it through dedicated API tools (e.g. Postman, Curl) or through another browser session. This feature won’t work if the instance is behind the proxy and referrer is not present in the header request.
Allow Users to change password
Admins can choose whether to allow the user to change their password or not. If the users are created through SSO, their passwords are automatically generated and stored in the application. Users wont be able to change their auto generated password if this option is disabled. If you don’t want users to change the password and skip SSO you should enable this option.
Auto Activate Users on SSO
If enabled, the user’s which are currently disabled in the application will be automatically activated on successful SSO. Admins don’t have to manually enable them.
Remember-Me cookie
If Remember-me option is enabled, the user will be remembered by the system even after browser is closed by the user. This is carried out using the remember me cookie, where the user session is created using remember me cookies. The user will not be logged out until he chooses to explicitly logout.
*This is specific to Jira.
**This is specific to Jira and Confluence.