Auto-Activate Users
The Auto-Activate Users tab allows admins to automatically assign users to specific groups when they raise a ticket.
It reduces manual intervention in onboarding workflows and ensures users gain the right access immediately upon creating requests.
This section is divided into two key areas:
Automation Rules Overview
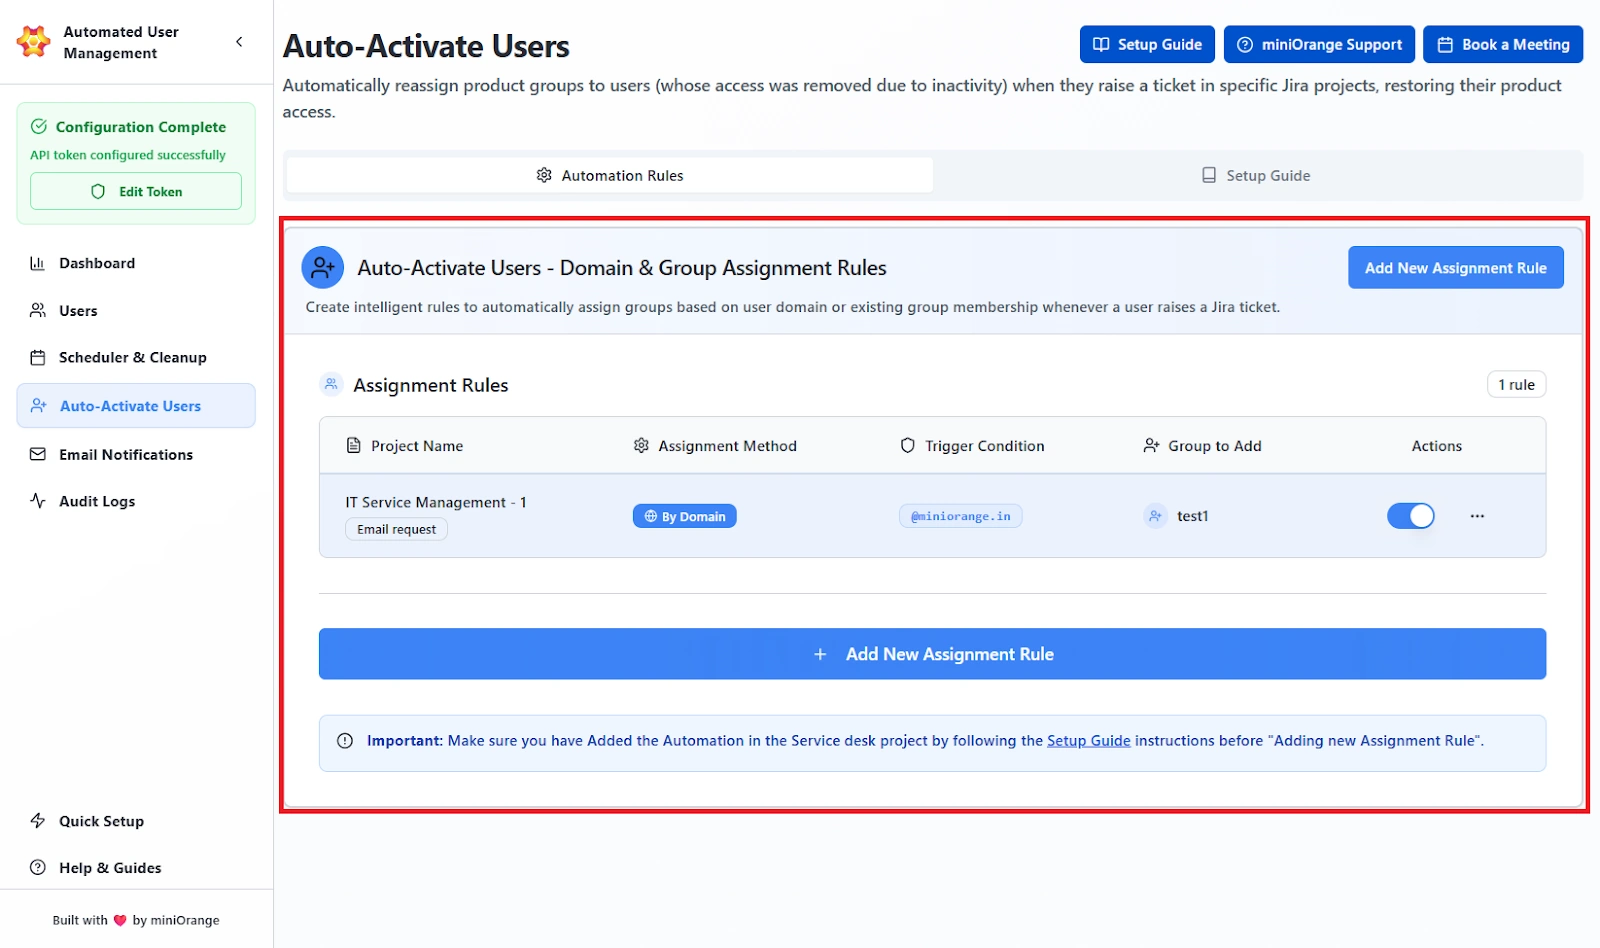
The Automation Rules panel displays all configured auto-assignment rules that control how users are automatically added to groups.
Assignment Rules Table:
Here, the admins will find the list of all the existing rules (if configured) with details such as:
- Project Name: Displays the Jira service desk project where the auto-assignment rule is applied.
- Assignment Method: Indicates whether the rule assigns users based on their email domain or existing group membership.
- Trigger Conditions: Defines the email domain or the group that was specified in the assignment method to activate the rule.
- Group to Add: Shows the Jira group(s) that users will automatically be added to when the rule is triggered.
- Action Toggle (Active/Inactive): Allows administrators to enable or disable a specific rule without deleting it.
Setup Note:
The system requires that Jira Automation be configured before assignment rules can be activated.
Setup Guide for Jira Automation
Before creating an assignment rule, administrators must set up Jira’s internal automation to detect ticket creation events.
The Setup Guide tab provides a detailed walkthrough for this setup.
Add New Assignment Rule

Administrators can define new assignment rules to automate user group additions based on either domain or existing group logic.
Click Add New Assignment Rule to launch the rule creation wizard.
This can be done in the following two steps:
Step 1: Select Internal Jira Project:
Choose the Jira project to monitor for user activation (e.g., IT Support).

Step 2: View Available Sub-Request Types:
Once you have selected the Internal Jira Project, you will be able to see the section displaying all request types under the selected project.
Example:
- Fix an account problem
- Get IT help
- Onboard new employees
- Request a new device
Step 3: Configure Assignment Rules
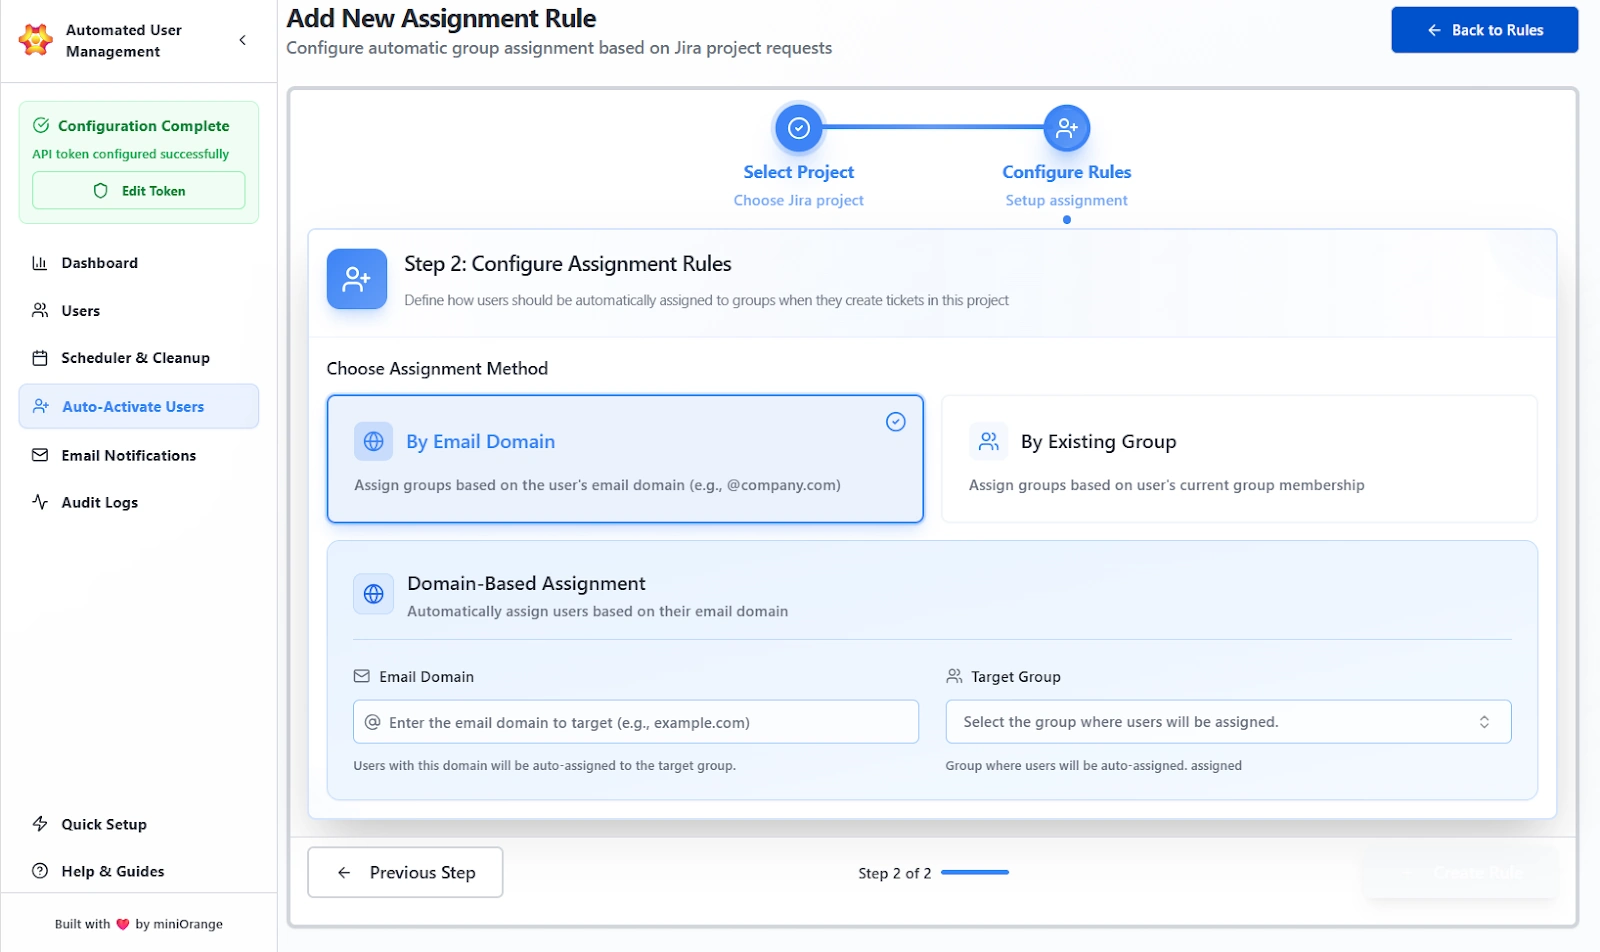
After selecting a project and request type, configure how users will be assigned to groups.
Assignment Methods Available:
1. By Email Domain
Automatically assign users to groups based on their email domain.
Here, the admin can:
- Enter the domain to target (e.g., example.com)
- Select the Jira group to which users from this domain should be added
2. By Existing Group
Assign users to new groups based on their existing group memberships.
- Select the group that the user is already part of
- Choose the group to which the user should be auto-assigned
Once the complete configuration of the rule is done, admins can save and activate the rule.
It will now appear in the main list under Assignment Rules.
Use Case Scenario
A new user submits an IT Support ticket using an email ending in employer.com, and you want them to be added to the “employees” group automatically without anyone manually approving or assigning them.
How it works
Create a new assignment rule with:
- Project: IT Support
- Trigger: Any Request Type
- Assignment Method: Email Domain
- Domain: employer.com
- Add to Group: employees
Once the rule is saved, any requester with that domain is automatically placed in the “employees” group the moment they create a ticket.
Benefit
This removes the usual onboarding delay that happens when support teams wait for admins to grant access.
It ensures new employees get the permissions they need instantly, keeps support workflows moving, and cuts down on repetitive admin tasks.
Email Notifications
The Email Notifications tab allows administrators to configure automated email alerts related to user deactivation, product access removal, or other automated user management events.
These notifications ensure that users are informed in advance before their accounts are modified or deactivated, improving transparency and compliance.
All email notifications configured will be sent from “noreply@miniorange.com”.
Email Templates Overview
The Email Templates section lists all available notification templates and their details at a glance.
The admins will find a list of all configured email templates in this section.
The following details are shown in each section:
-
Template Name
Shows the exact purpose of the email template, such as “User Deactivation Notice” or “Access Removal Warning.”
The name must clearly reflect what the email communicates. -
Timing
Displays the number of days of user login inactivity after which the email will be sent.
Example: “7 days since inactivity” means the email goes out seven days after the user last logged in. -
Last Sent
Shows the most recent date and time (UTC) when this template was successfully triggered and delivered to users. -
Recipients
Shows the number of users who received this template the last time it was triggered.
This confirms the email was actually used and who it reached. -
Status Toggle
- Enabled: The system will send this email when the rule conditions are met.
- Disabled: The template will not be sent under any circumstances.
Available Actions
- View
- Edit
Creating or Editing an Email Template
Click Edit to open the configuration form.
This interface allows administrators to define the content, timing, and format of an email notification.
Dynamic placeholders can be used in both the Subject and Body to insert user-specific data automatically.
Configurable Fields:
- Template Name
- Days Since Inactivity
- Email Subject
- Email Body
- BCC Recipients
Supported HTML Tags:
| Tag | Function |
|---|---|
<h1>, <h2>, <h3> |
Headings |
<p>, <br> |
Paragraphs and line breaks |
<strong>, <em> |
Bold and italic text |
<ul>, <ol>, <li> |
Lists |
Previewing and Managing Templates
After saving, templates can be reviewed directly from the Email Templates list.
The preview feature opens a pop-up window showing:
- The Subject line
- The Rendered Email Content with sample placeholder values (e.g., Dear John Doe)
- The Dynamic Variables Notice at the bottom
Use Case Scenario
You need users to receive a warning 7 days before their Jira access is removed because they’ve been inactive.
How it works
Create or edit a template and set:
- Days Since Inactivity: 23 (because cleanup rule triggers at 30)
- Subject: “Your Jira access will be removed soon”
- Body: Add placeholders such as username, inactivity days, last login date, etc.
- Enable the template
When the cleanup rule runs, the system automatically sends the notification exactly 7 days before the user reaches the 30-day inactivity threshold.
Benefit
Users and managers get advance notice, preventing surprise lockouts and reducing support tickets.
It keeps the cleanup process transparent and aligned with compliance requirements since every notification is timestamped and traceable.