Users Tab
The Users Tab provides admins with a central interface to manage all user accounts within Jira Cloud. It allows filtering, searching, and performing bulk actions to activate, deactivate, suspend, or delete users, as well as manage their group memberships.
This section is divided into two key areas:
- Basic User Info
- Detailed User Info (CSV)
Basic User Info
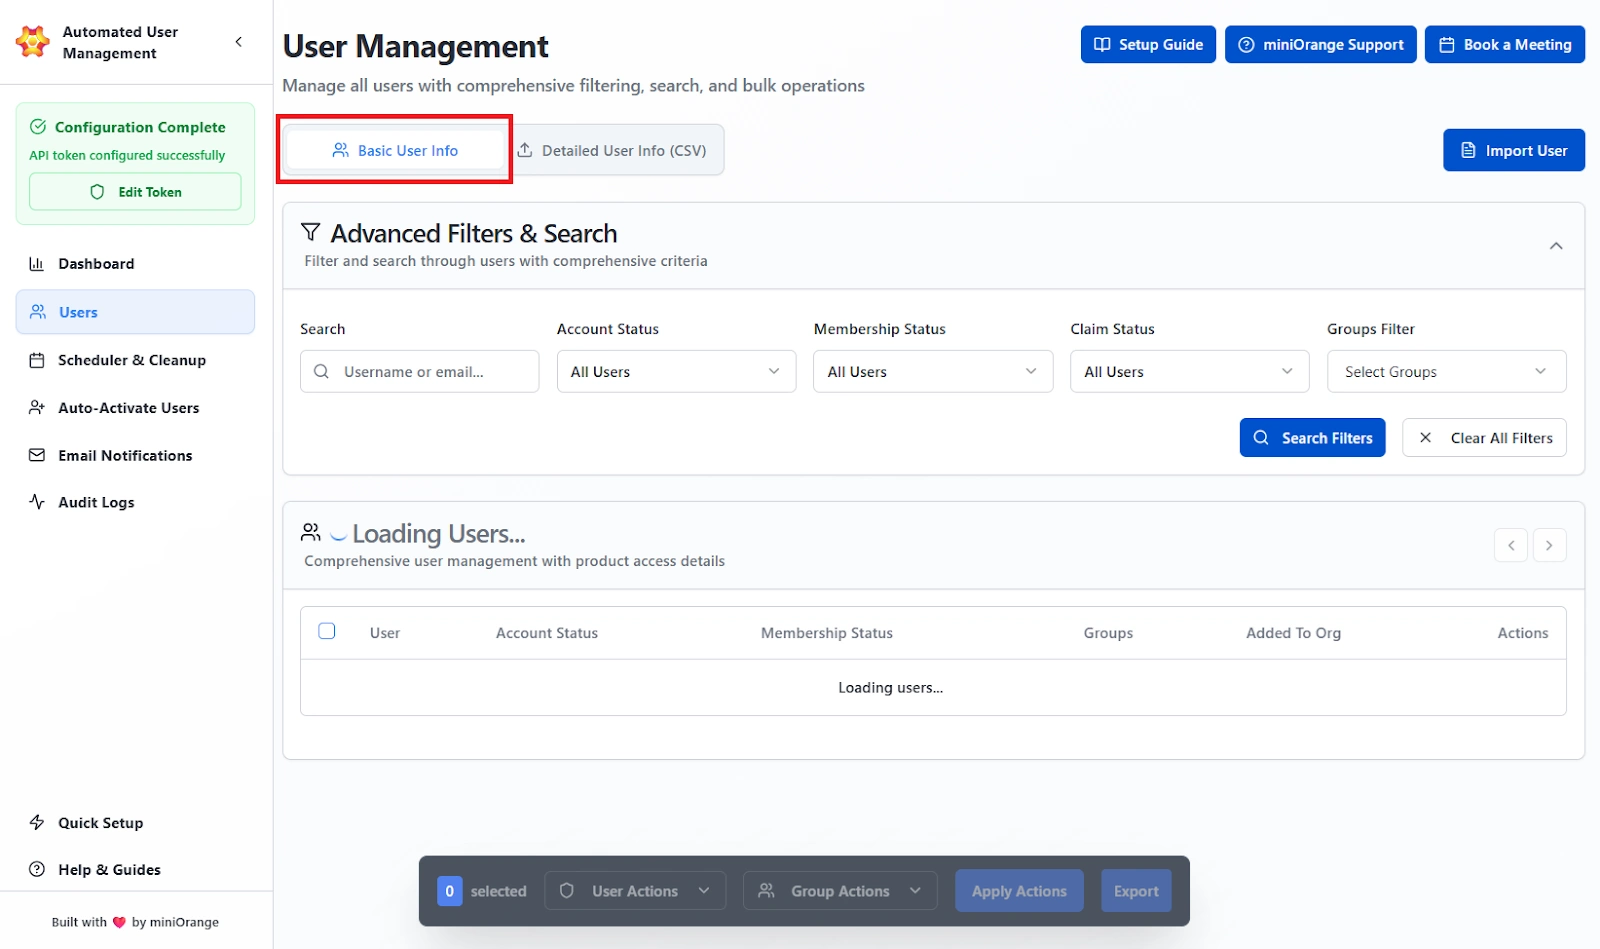
The Basic User Info section displays a dynamic table of all users connected to your Atlassian organization. Administrators can filter, search, and perform individual or bulk actions directly from this interface.
Advanced Filters & Search
The Advanced Filters & Search section enables fine-grained filtering based on multiple criteria.
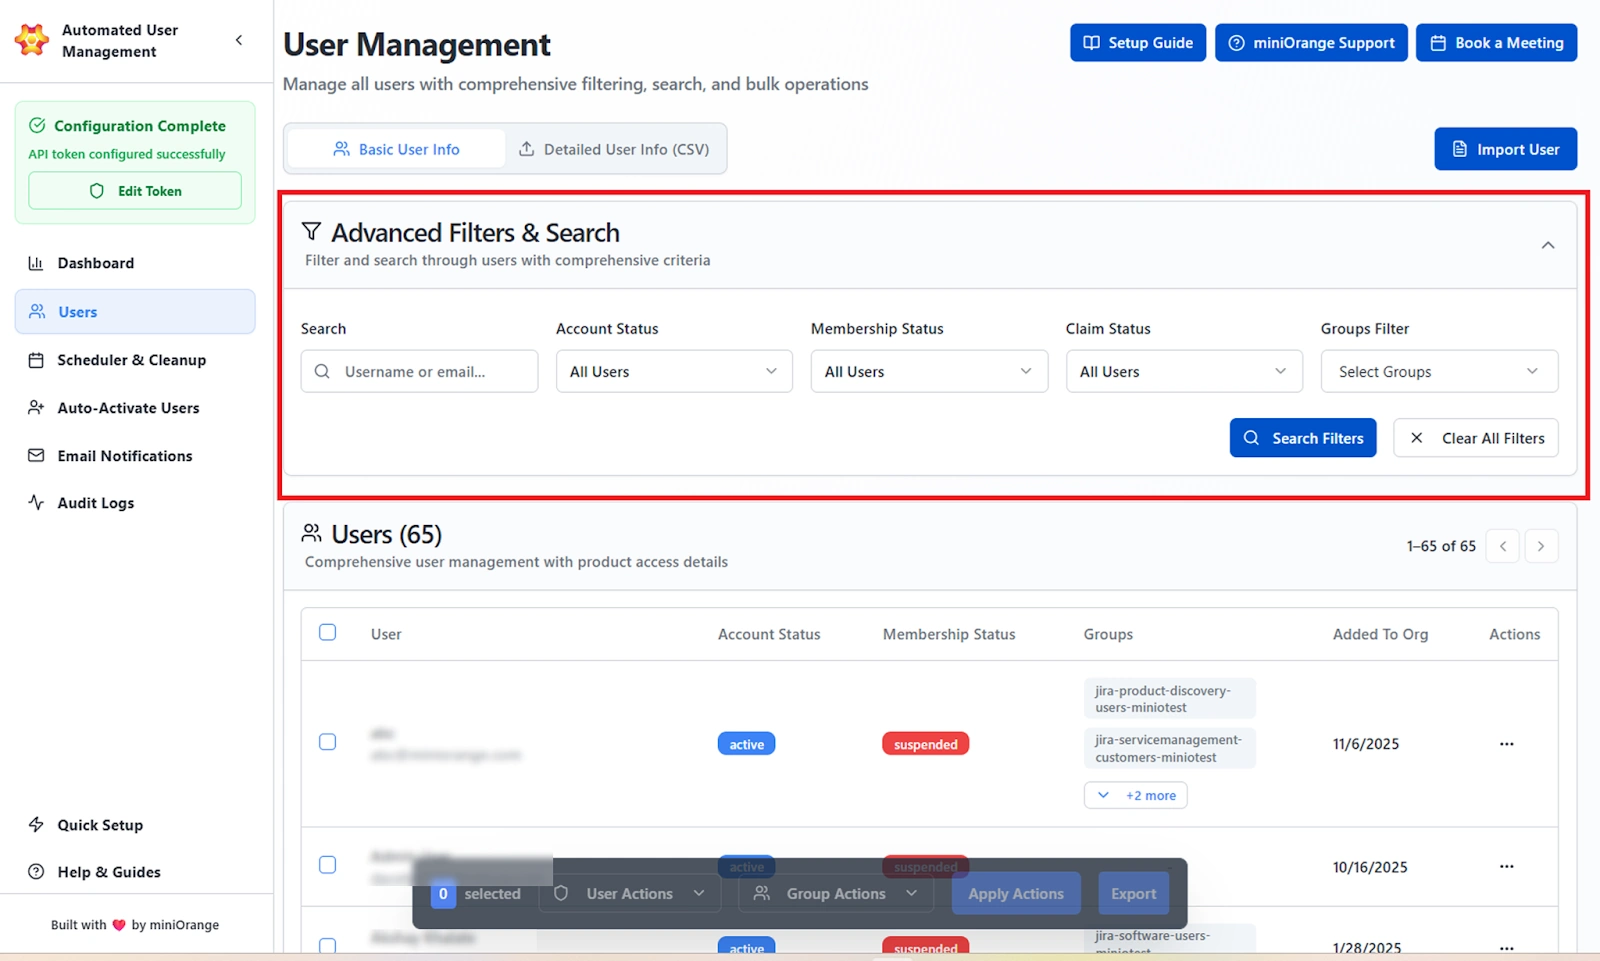
Available Filters:
- Search: Locate users by their username or email address.
- Account Status: Filter the users on the basis of their account status, whether it is active or deactivated.
- Membership Status: Filter the users based on whether their account is active or suspended.
- Claim Status: Filter users by their claim type, that is all users or only managed users.
- Groups Filter: Filter users belonging to one or more specific groups.
Actions Available:
- Search Filters: Apply selected filter combinations.
- Clear All Filters: Reset all applied filters to view the complete user list.
User List
Displays all users in a paginated table along with account and product-level information.
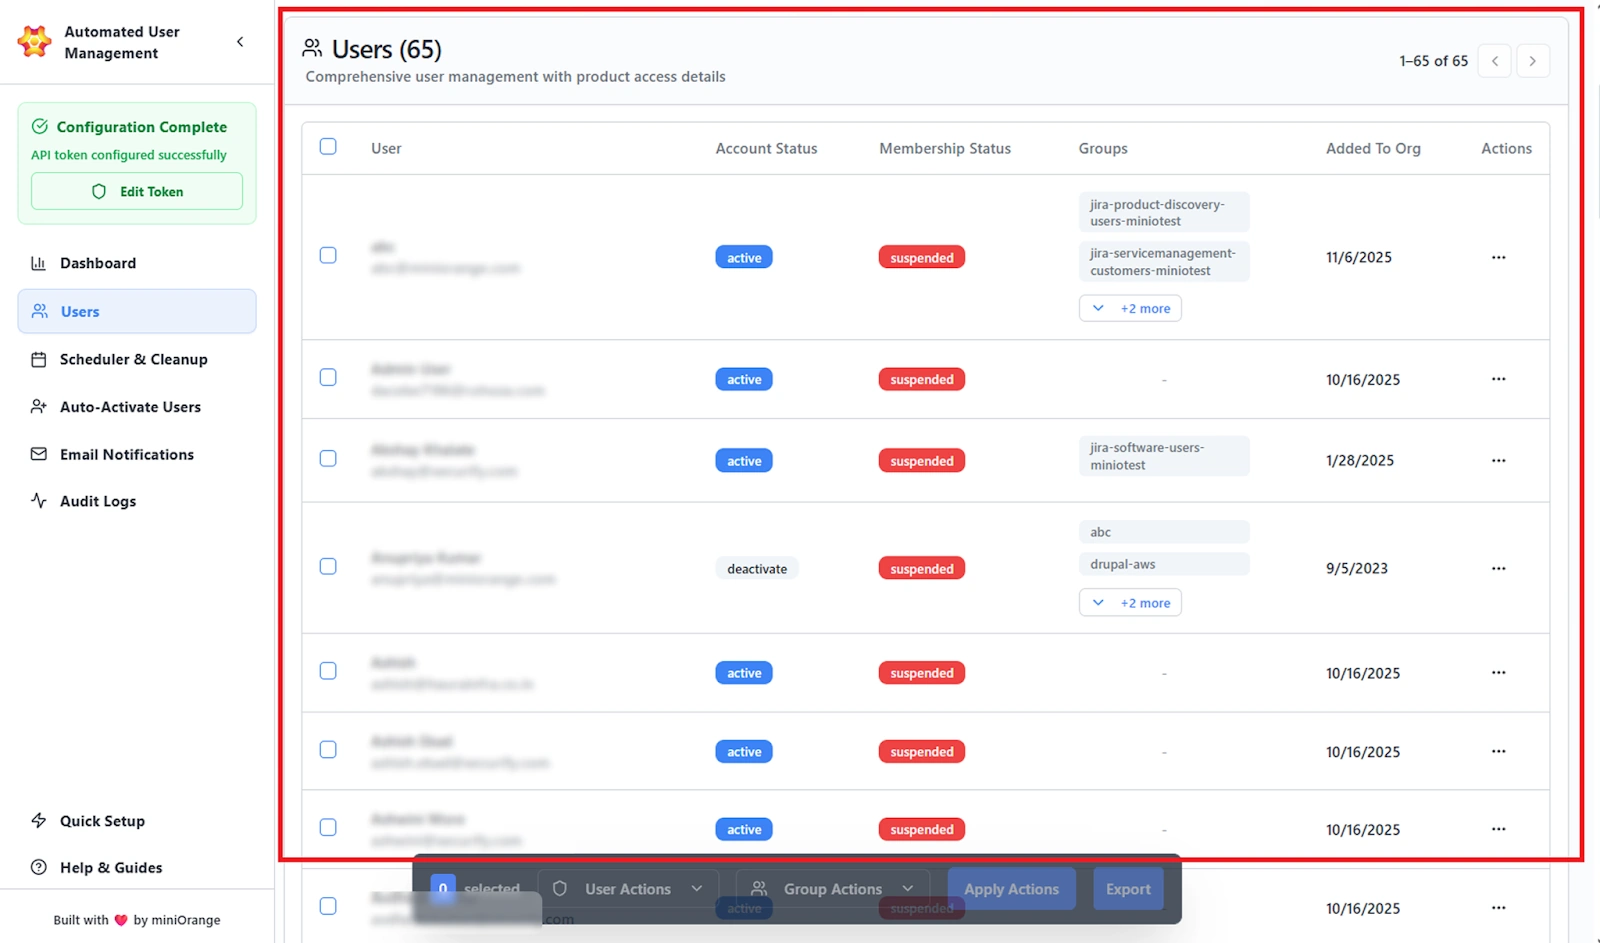
Columns Shown:
- User: Username and email address.
- Account Status: Indicates if the user is active or deactivated.
- Membership Status: Shows whether the user’s account is active or suspended.
- Groups: Lists all groups the user is assigned to (expandable for multiple groups).
- Added to Org: Displays the date the user was added to the organization.
- Actions: Context menu (three-dot icon) for individual user operations. These actions include Fetch Last Login, Deactivate User, Suspend/Restore User, and Delete User.
Bulk Actions
The Users tab supports performing bulk operations on multiple users simultaneously. Select users via checkboxes to enable the Action Bar at the bottom of the screen.
User Actions
Bulk actions related to user accounts.
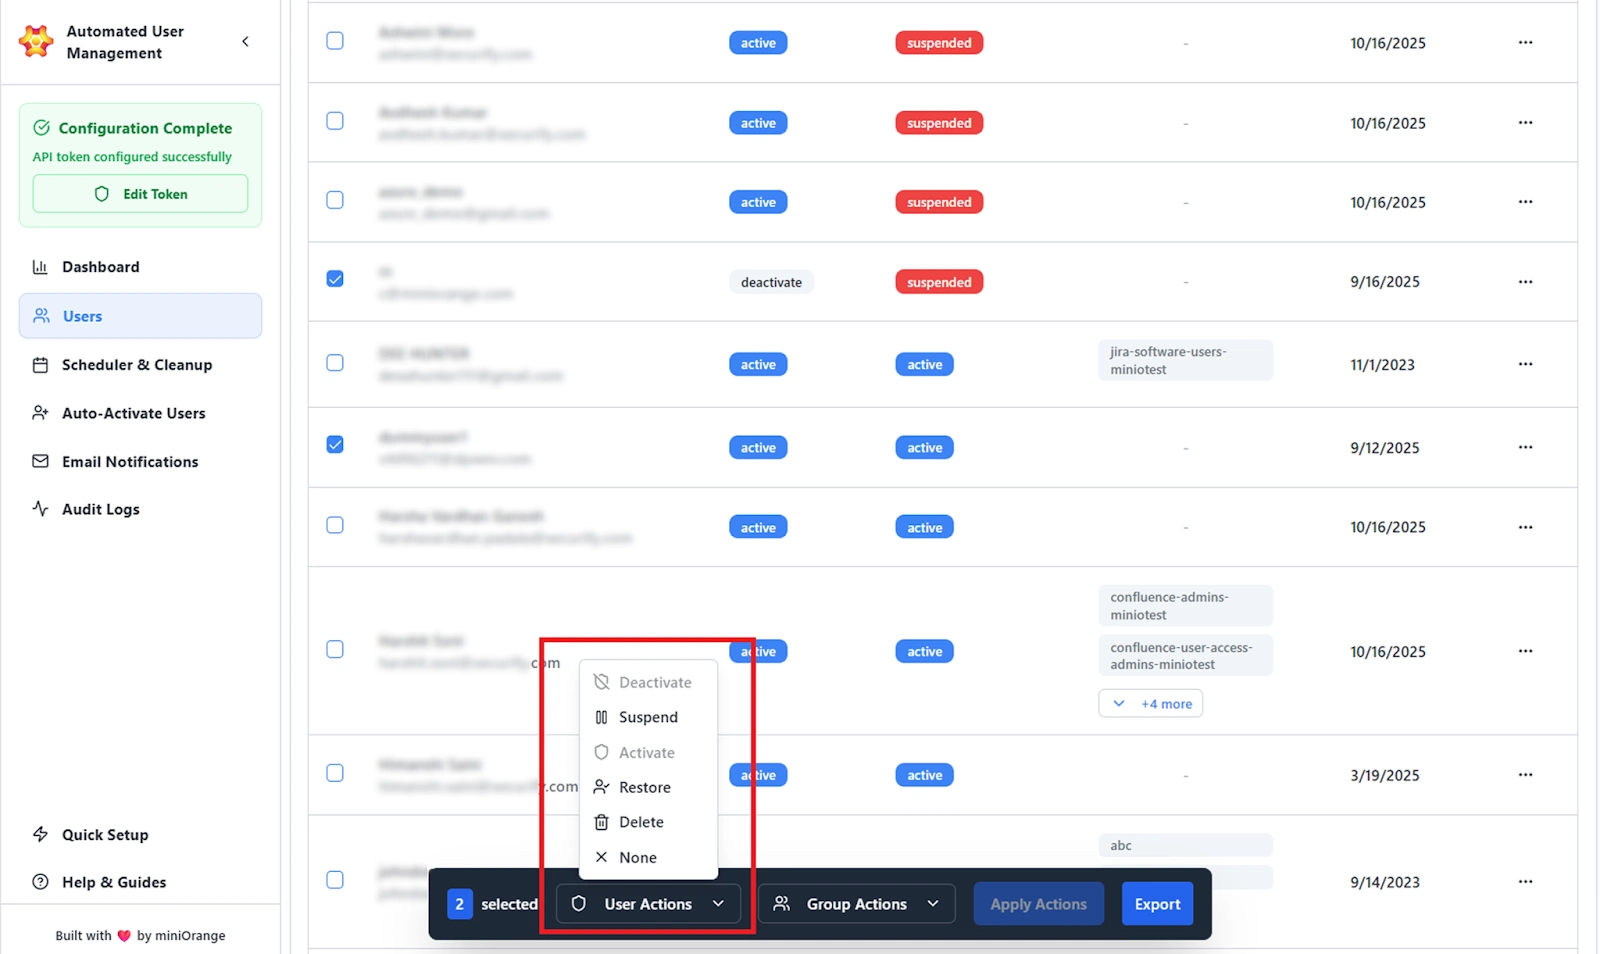
Options Available:
- Deactivate: With this operation, admins can disable managed accounts. Once deactivated, the users will not be able to log in.
- Suspend: Temporarily pause product access for all users, including managed and external. This action can be performed on all users and removes their access to selected products only.
- Activate: Reactivate users who were previously deactivated.
- Restore: Reinstate access for suspended users.
- Delete: Permanently remove selected users. This will cause the removal of their Atlassian account permanently.
- None: No action selected (resets dropdown).
Group Actions
Bulk actions related to user group management.
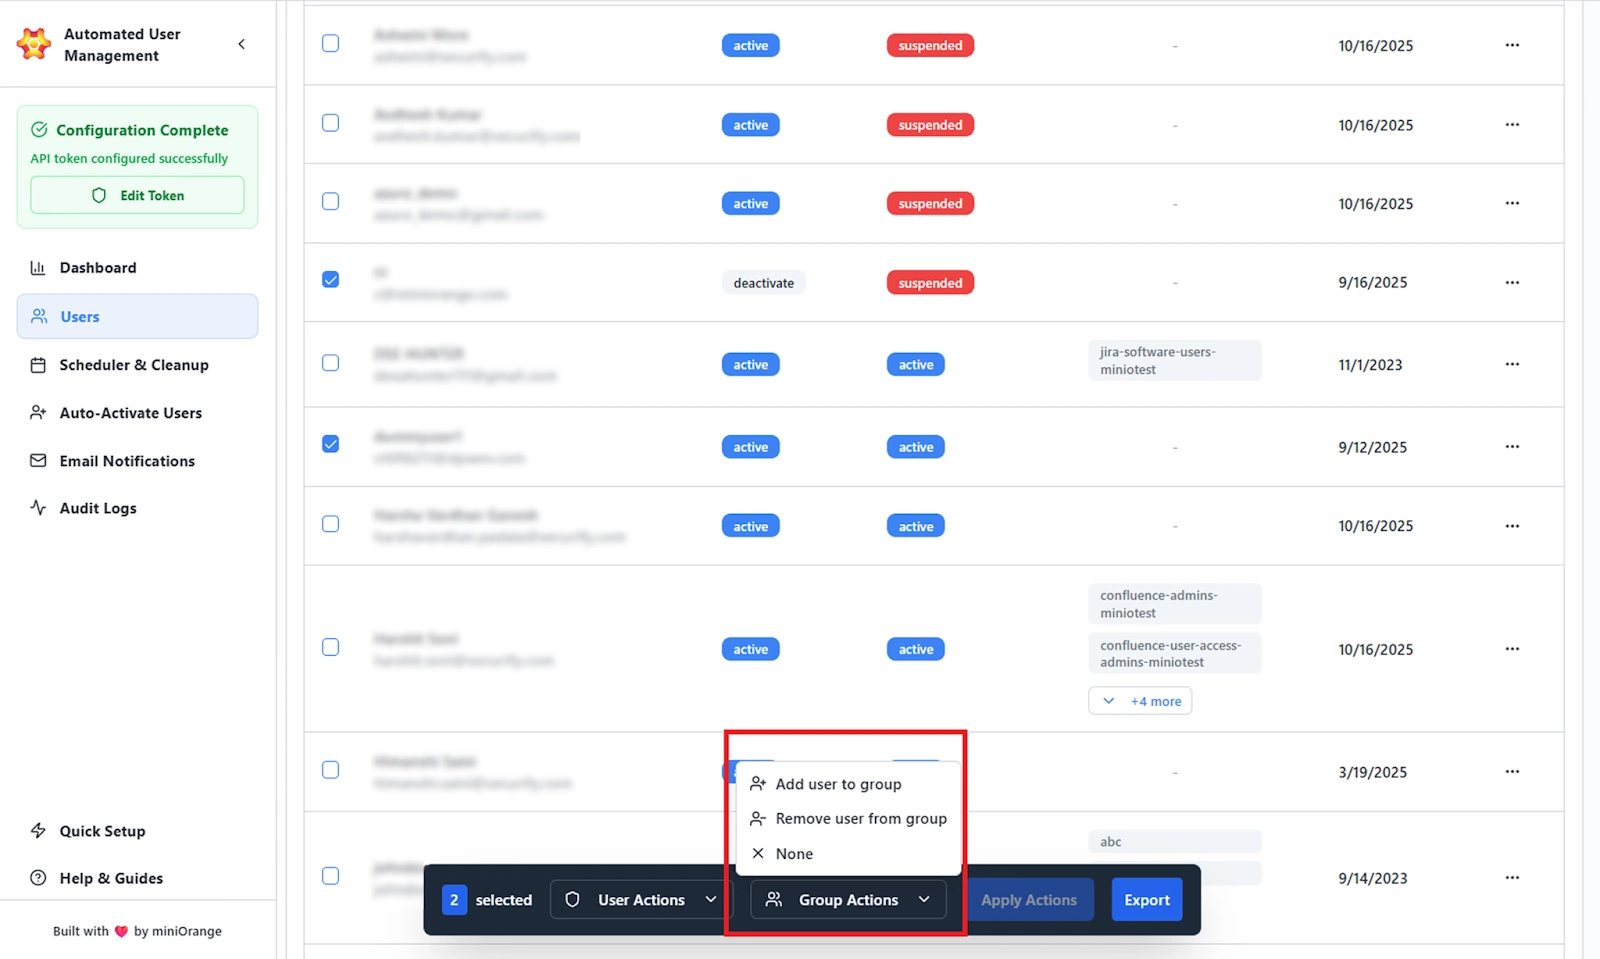
Options Available:
- Add User to Group: Assign one or more selected users to existing groups.
- Remove User from Group: Remove selected users from specific groups.
- None: No action selected (resets dropdown).
When “Add User to Group” is selected, a Group Selector window opens:
- Search for and select one or more groups.
- Click Confirm to apply the change.
Once one or more users are selected:
- Click Apply Actions to execute all selected User and Group Actions simultaneously.
- Click Export to download the filtered user list as a .csv file.
Use Case Scenario
You need to identify all users in the “contractors” group who were added more than 60 days ago, so you can review their access and decide whether they should retain licenses or remain in the organization.
How it works
- Open the Users tab and apply the Groups filter to select the “contractors” group.
- Apply Membership Status and Claim Status filters to isolate external or unmanaged users, depending on your organization’s setup.
- The filtered list instantly shows only users who match all selected conditions.
From this view, you can:
- Export the list for audits, compliance checks, or reporting.
- Perform bulk actions such as Deactivate, Suspend, or Remove from Group to enforce access policies.
Benefits
This workflow allows admins to precisely segment users based on identity type, group assignment, organizational membership, and historical account activity.
It simplifies governance over external vendors, contractors, and part-time resources while keeping core employees unaffected.
User Import
The User Import feature enables admins to bulk onboard users into Jira Cloud using CSV files. It automates the creation of user accounts, group assignments, and even group creation if necessary.
This functionality ensures smooth migration of users at scale, minimizing manual input and maintaining complete traceability in audit logs.
The import process is divided into four steps:
- Upload CSV
- Map Columns
- Select Features
- Preview & Import
1. Upload CSV
The first step is to upload your user data file. The system validates file format and checks required columns before proceeding.
- Drop your CSV file directly into the upload box, or click Choose File to browse and select the file manually.
CSV Requirements:
- Must include email and optionally groups columns.
- Multiple group memberships should be separated by commas.
- Compatible with CSV exports from Jira Cloud and Jira Data Center.
- Option to Download Sample CSV is provided for formatting reference.
After file selection, click Next to proceed to column mapping.
2. Map Columns
In this step, administrators map the columns in the uploaded CSV file to the required system fields.
Field Mapping:
- Email ID (Required): The column containing the user’s email address.
- Group (Optional): The column that contains one or more group names.
Dropdown Selection:
The app automatically detects columns from the CSV and lists them for mapping.
Validation:
The system checks that the email column is mapped before proceeding. If the mapping is invalid or incomplete, a prompt notifies the user.
3. Select Features
In this step, administrators decide what actions the system will perform using the imported data.
Available Configuration Toggles:
- Create New Users: Automatically create new Jira Cloud users based on CSV email entries.
- Add Users to Groups: Assign imported users to specified groups as per CSV mapping.
- Create New Groups (if not already present): Automatically create new groups when the listed group name does not exist.
4. Preview & Import
Before execution, admins can verify and confirm all import details.
The import summary includes the following:
- Total users to be imported.
- Mapped Email and Group columns.
- Selected feature configurations.
Data Preview:
Displays the records from the CSV to confirm data accuracy before import.
Confirm & Start Import – Begins final import operation.
Tips:
- Ensure no duplicate emails exist in the CSV.
- Verify that group names match exactly with Atlassian group names.
- Avoid extra spaces or hidden characters in CSV cells.
Use Case Scenario
Your HR team has onboarded 50 new employees and handed over a CSV file containing their email IDs and the groups they should belong to. You need to create these accounts and assign groups without manually adding each user.
How it works
- Open the Import Users module and upload the CSV.
- Map the CSV columns to the required fields: Email and Groups.
- Enable Create New Users to allow the system to generate any user records that don’t already exist.
- Enable Add Users to Groups to ensure each user gets the correct access set during import.
- Run the import. The app automatically creates the accounts (if needed) and assigns them to the specified groups.
Benefits
This workflow eliminates repetitive onboarding tasks and enforces consistent group structures across teams.
It prevents access gaps, reduces manual errors, and ensures new employees start with the correct permissions from day one.
Because every action is logged in the Audit Logs, the entire process remains transparent, traceable, and compliant.
Detailed User Info (CSV)
The Detailed User Info (CSV) section enables admins to manage existing users at scale using data exported from Atlassian Admin Console.
Admins can upload a CSV file exported from Atlassian Admin. The system automatically maps key user attributes and provides actionable insights directly from the uploaded data. The admins will be able to:
- Upload user data directly from Atlassian Admin export.
- Automatically detect and map key columns (e.g., email, account status, product access).
- Filter and sort users by multiple conditions.
- Automatically log all actions in Audit Logs for compliance.
Filtering and Search
After CSV upload, the app provides comprehensive filters to help narrow down the dataset.
Available Filters:
- Username / Email: Search by individual user details.
- Account Status: Filter by Active, Inactive, or Suspended users.
- Added to Org: Filter based on user creation or join date.
- Last Active: Filter by last login duration (e.g., users inactive for 30+ days).
- Never Logged In: Isolate users who have never accessed Jira or other products.
- Org Role / Group Membership: Segment users based on organizational or group association.
Active filters are displayed as badges above the table for quick removal.
All actions display progress indicators and are recorded in Audit Logs.
Use Case Scenario
Your organization has exported a complete user list from Atlassian Admin as part of a quarterly compliance or security review. You need to analyze this data for your audit team.
How it works
- Open the Detailed User Info tab and upload the exported CSV.
- Apply filters such as Suspended, Inactive for 120+ days, Never Logged In, Managed vs Unmanaged, or any combination required for your review.
- The system immediately segments the dataset based on the selected criteria, allowing you to pinpoint unused accounts, external collaborators, or identity-type mismatches.
- Export the filtered results and share them with your security team for further action.
Benefits
This allows offline-like analysis directly within the app without hitting Atlassian APIs.
It offers deeper data visibility, enables quick discovery of anomalies, and supports compliance workflows that rely on strict user access audits.