Add New IDP
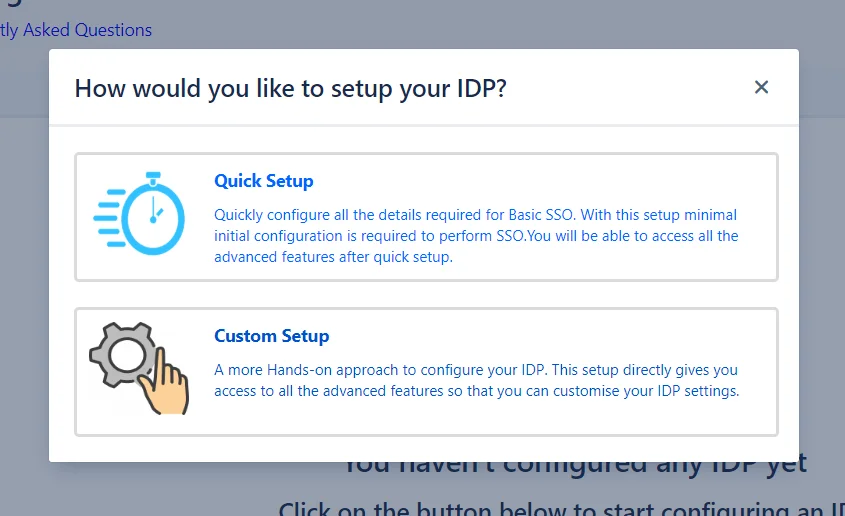
With this plugin, there are two ways you can go about adding a new IDP. You can choose either of these ways to enable SSO for your Service Provider depending on how comfortable you are with the intricacies of Single Sign On.
Once you get into the plugin you will be guided through each step, every tab and all the different settings that we provide. To get a brief overview of what you’re getting into you can have a look at both methods of the configuration below:
-
Quick Setup : This method is for the express configuration of SSO for your Service Provider. It guides you through minimum configurations required to set up a successful SSO connection. Add your IDP and enable SSO within a matter of minutes.
-
Custom Setup : This is a more hands-on approach. You can dive right into the myriad of settings we provide that give you control over the SSO flow and allows you to highly customize it according to your needs.
Quick Setup
Quickly setup Single Sign-On with our guided setup wizard. The settings covered in quick setup are minimum and aimed at getting a quick start with SSO. All of these settings are presented in a convenient Q&A format that gives you a better understanding of what a particular setting is for. You can always go through our detailed Custom Setup.
When this option is chosen from the pop-up, a page is displayed with a list of all the supported IDPs. After an IDP is chosen, the Quick Setup method is initiated.
This method consists of 5 quick and easy to understand steps that will let you:
- Setup an application on your Identity Provider for your Service Provider. In this case, you Service provider will be the Atlassian application for which you wish to setup SSO.
- Add this Identity Provider to your Service Provider.
- Sync a user’s profile after SSO.
- Choose which groups you want to assign to all the users from this Identity Provider.
- Testing final setup
For the ease of understanding, from here on the term Service Provider has been abbreviated to SP, and Identity Provider to IDP.
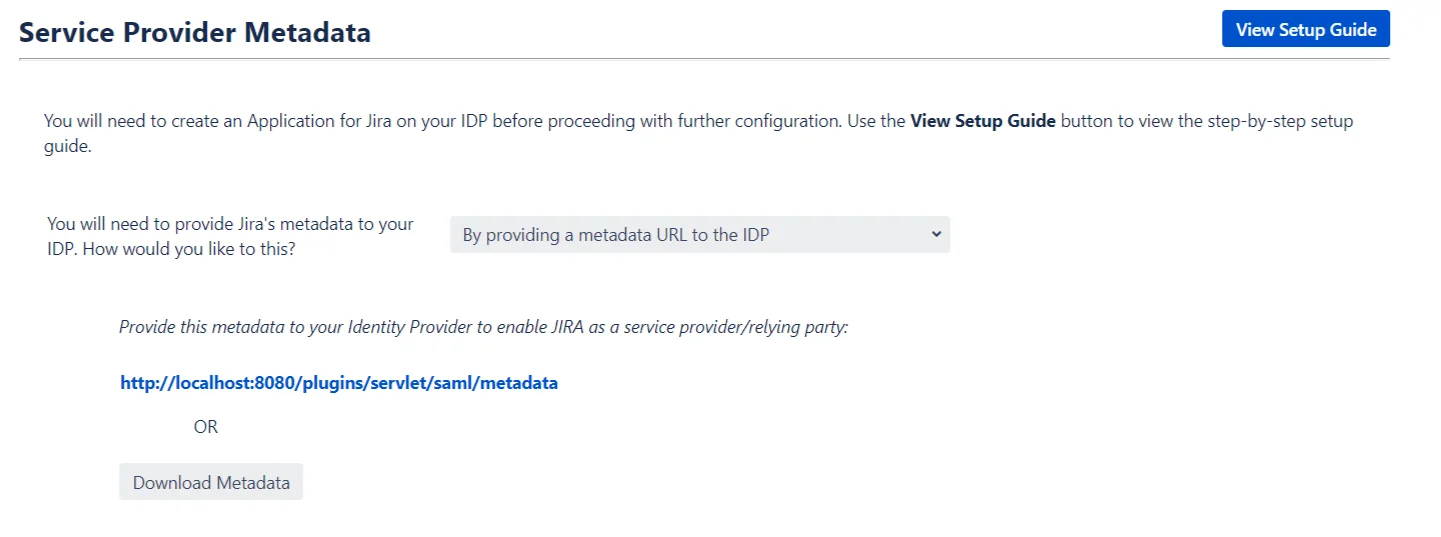
Step 1: Service Provider Metadata
In-order to perform SSO, the IDP and the SP need to be able to talk to each other. In this step, you will be configuring an application on your IDP that will allow communication with your SP.
The steps to configure this application can be accessed by clicking on the View Setup Guide button.
There are some details about the SP that will need to be provided to the IDP to configure the aforementioned application. These details can be provided in a number of ways.
Configuring SP metadata on your IDP
- By providing a metadata URL or File to the IDP: This is by far the easiest way to configure the application on your IDP. We recommend this option as it reduces the amount of configuration needed to set up the application. On choosing this option, a metadata URL and a Download Metadata button will be displayed. Depending on the IDP either the URL can be used to import SP metadata or the metadata file, which can be downloaded using the provided button.
- By manually configuring the metadata on your IDP: In-case your IDP does not support importing the metadata via URL or file, you will need to manually enter the details on your IDP. These SP details are displayed in a tabular format on selecting this option.
What if I have a proxy setup?
If the SP is being run behind a proxy, then it’s metadata will need to be updated accordingly.
Running your SP with a proxy changes it’s base URL. The metadata needs to be updated according to the proxy because most of the details in the metadata are subject to change based on the URL used to access your SP.
You can update the metadata by using the link provided in the info section at the bottom of this step.
Clicking on this link will reveal two input fields, one for SP Base URL and another for SP Entity ID.
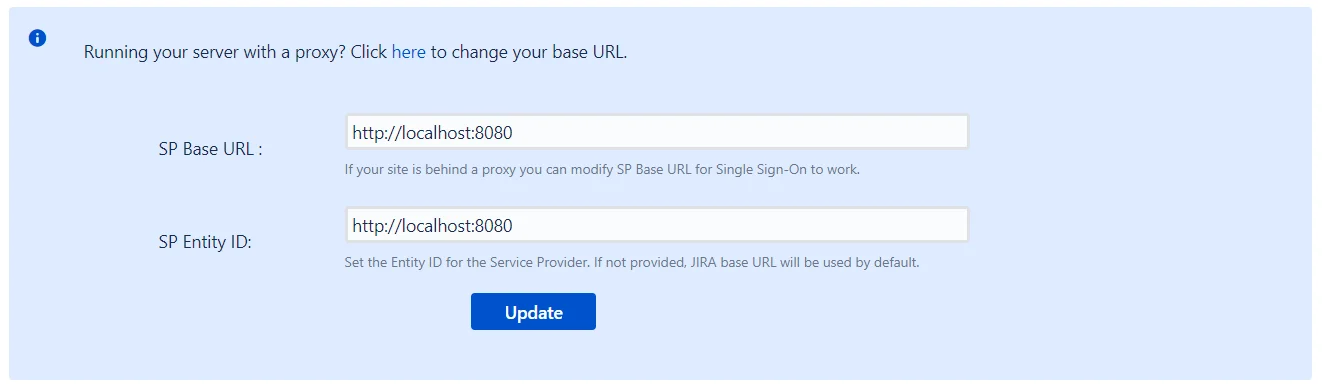
The updated values for both these fields can be entered here and saved. This will update the SP’s metadata and this updated metadata will need to be provided to your IDP.
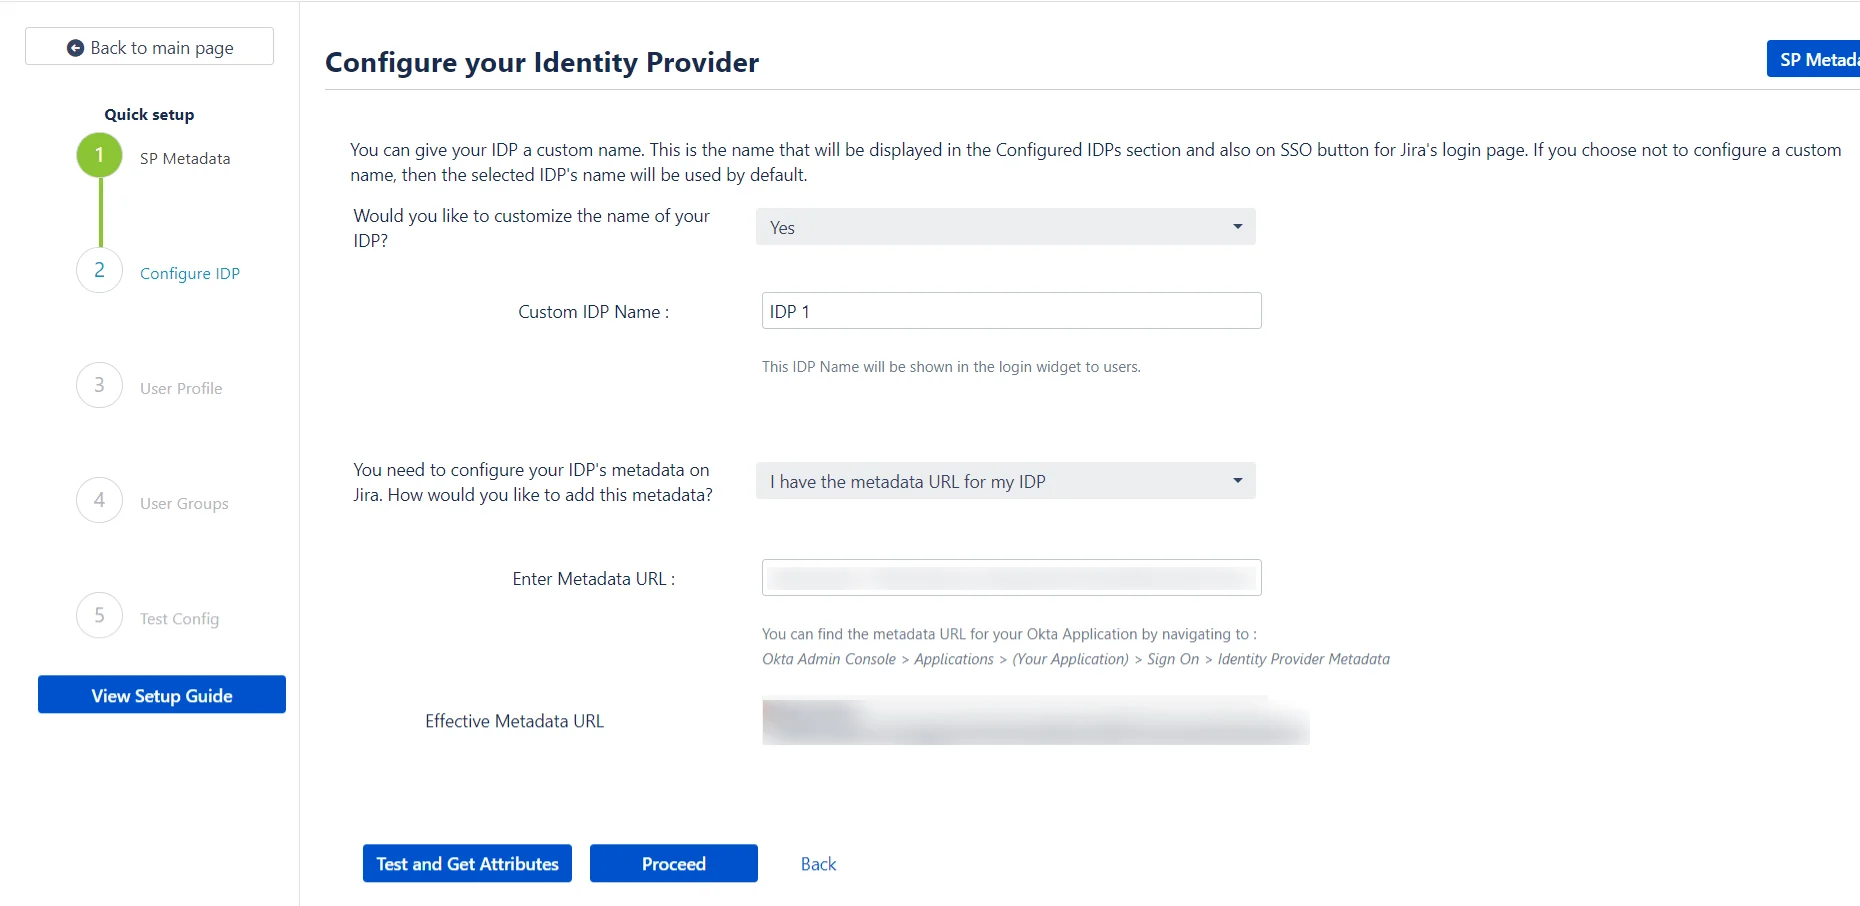
Step 2: Configure IDP
Now that we have configured your IDP to be able to communicate with your SP, we need to make sure that your SP can, in turn, communicate with the IDP.
This is done by configuring your IDP’s metadata within the plugin.
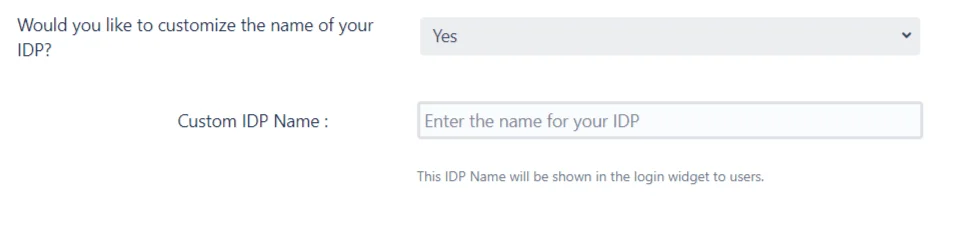
The plugin allows a custom name to be configured for the IDP being added.
Users can use this button to initiate SSO. Configuring a custom name will help distinguish this IDP from any previously added IDPs in the Configured IDPs tab. This is the name that will also be used as a label for the IDP’s button on the login page.
The plugin provides multiple ways to import the IDP’s metadata.
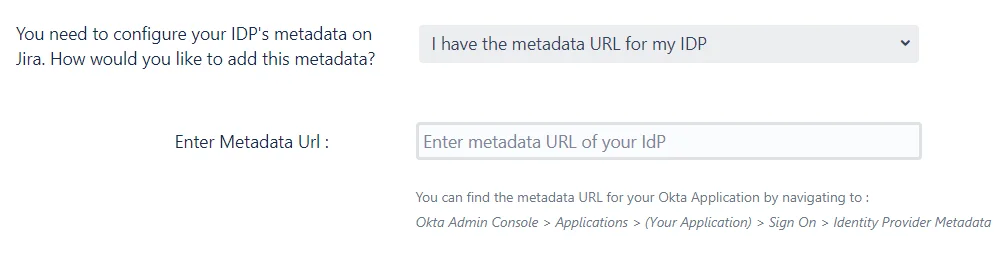
Configuring IDP metadata on SP
- I Have the metadata URL for my IDP: This is one of the simplest approaches to adding your IDP in the plugin. All you need is the URL for your IDP’s metadata, and you can then enter this URL is entered in the Enter Metadata URL field. After clicking on Save, the IDP will be imported into SP.
- I Have a file which contains the metadata: It’s possible that your IDP provides it’s metadata in the form of an XML file instead of a URL. If this is the case, then you can use this option and search of this file the Browse button. After clicking on Save, the IDP will be imported into SP.

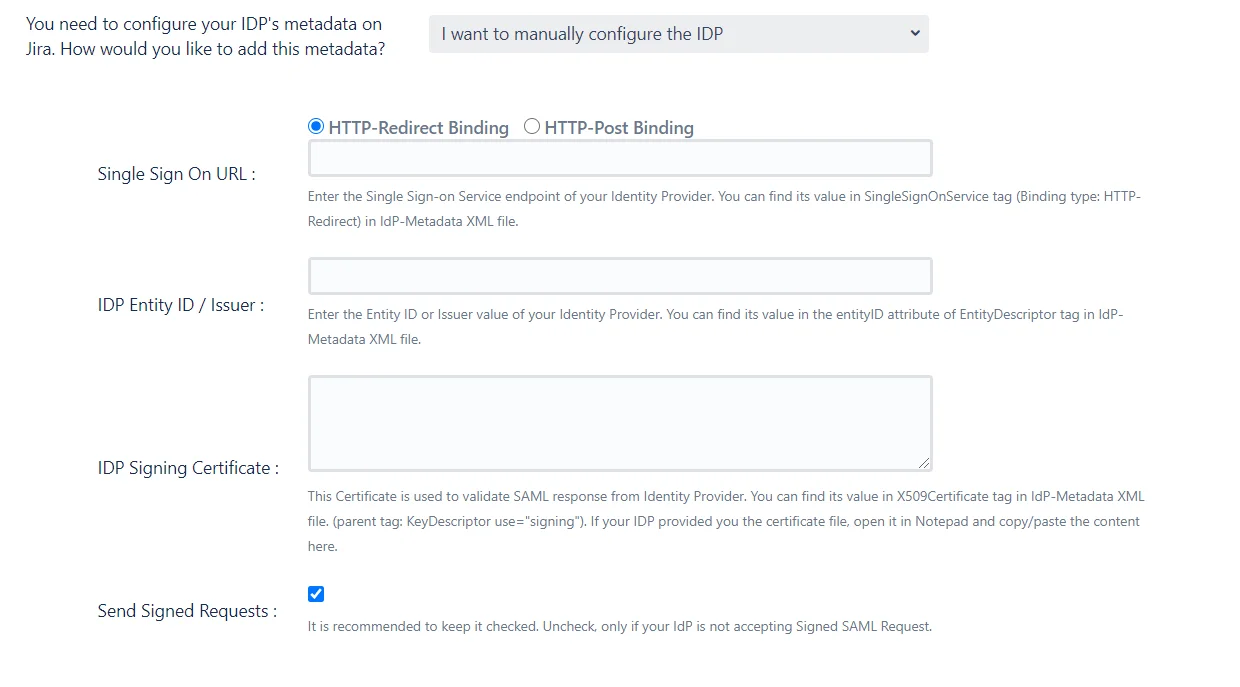
- I want to manually configure the IDP: If your IDP does not provide its metadata via a file or a URL, then the IDP will have to be configured manually. When this option is selected a set of fields where IDP details must be entered will be displayed. The IDP’s SAML SSO URL, Entity ID and Signing certificate are required to configure the IDP manually.
Testing the IDP Configuration
Once the source of IDP’s metadata has been added and the Save button is clicked, the plugin will import the metadata from the source and add the IDP to SP.
If this import is successful, a Test and Get Attributes button will be displayed. This option can be used to test the connection between the SP and the IDP.
Another advantage of performing this test is that IDP user attributes can be captured and recorded by the plugin. These user attributes are the SAML entries that will contain the end user’s IDP profile data. This means that these attributes will be helpful in configuring a user’s profile on the SP after they perform SSO.
While it’s not absolutely necessary to perform this action, it is recommended as it makes configuration in the next step a lot easier.
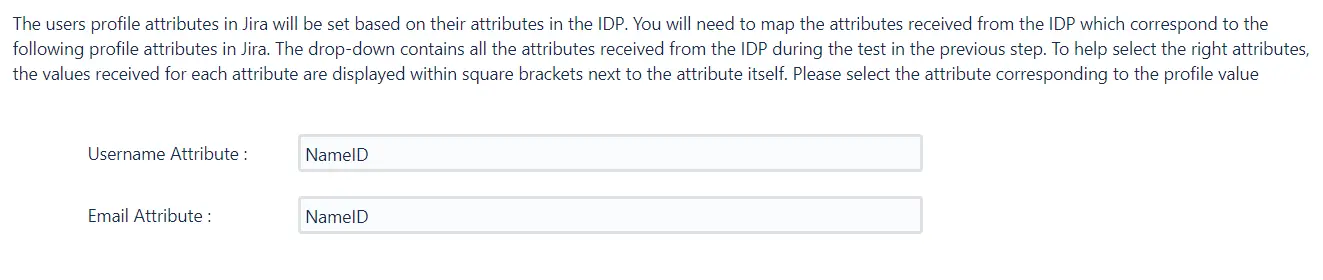
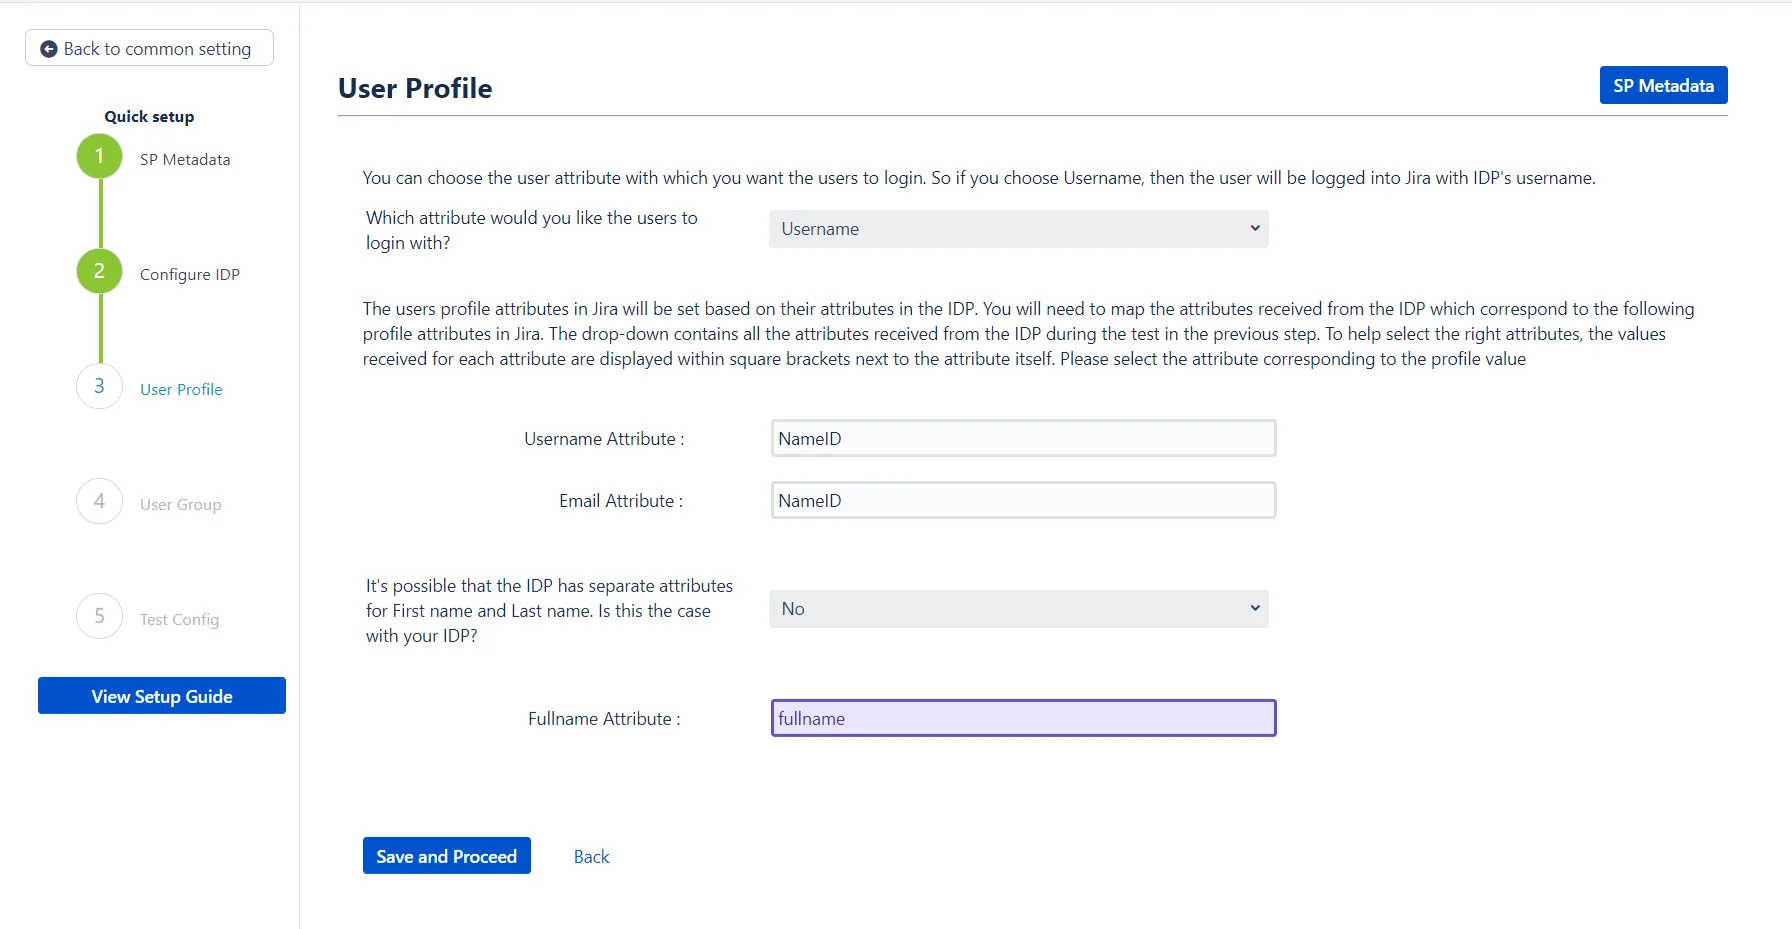
Step 3: User Profile
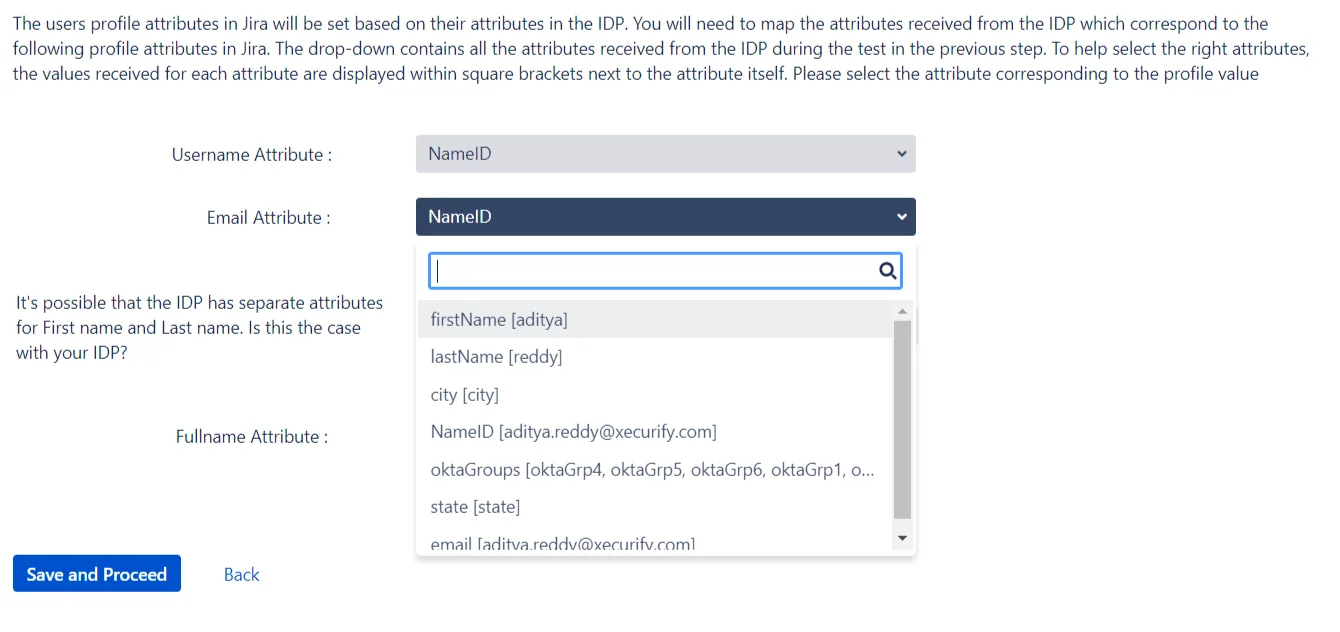
In this step, some of the user’s profile attributes in the SP can be added or updated according to the user’s profile in the IDP.
Attribute Mapping
During the process of SSO, the user’s profile data on the IDP is sent to the SP in a SAML response. Each element of the data is sent against an attribute in the response, which is to say that each attribute contains one aspect of the user’s data. For example, there will be one attribute which contains the user’s user name and another attribute that contains the user’s email and so on. In-order to update the user’s profile in the SP, the plugin needs to know the attributes which contain the user’s data in the SAML response.
These attributes are the details that will be configured in this step. The process of doing this is called attribute mapping.
How will your users login?
First, the plugin gives an option to choose whether the users will be logged in using their IDP username or IDP email.The default option is set to username. We recommend that this option be set to username because while there can be multiple users with the same email, the usernames will always be unique. If the option is set to email and a user who has multiple accounts with the same email ID tries to login, then SSO will fail.
Then, the attribute names for the user’s username and email on the IDP need to be entered. If the Test and Get Attributes action had been performed in the previous step, then a dropdown will be displayed for each input. This dropdown contains all the attribute names received from the IDP after performing the test. If this is the case, then all that needs to be done is to select the appropriate attribute for each input field from the dropdown.
If the Test action has not been performed, then each input field will be a text field. The attribute names from each input will need to be searched for and entered manually.
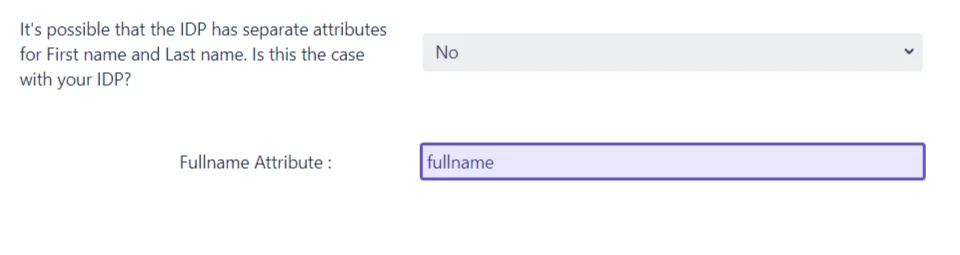
Configuring some additional user attributes
Next, the attributes for the user’s full name will need to be configured. The attribute mapping for the user’s name will depend on how the IDP sends the name in the SAML response. The IDP could either send the user’s full name against one attribute, or have two separate attributes for the user’s first name and last name.
The plugin has an option to configure the user’s name according to the attributes received in the response. If the user’s name is sent against one attribute, then yes is selected in the dropdown and the input field for the user’s fullname attribute is displayed.
On the other hand, if there are two attributes for the user’s name and no is selected in the dropdown, two input fields will be displayed for the first name attribute and the last name attribute.
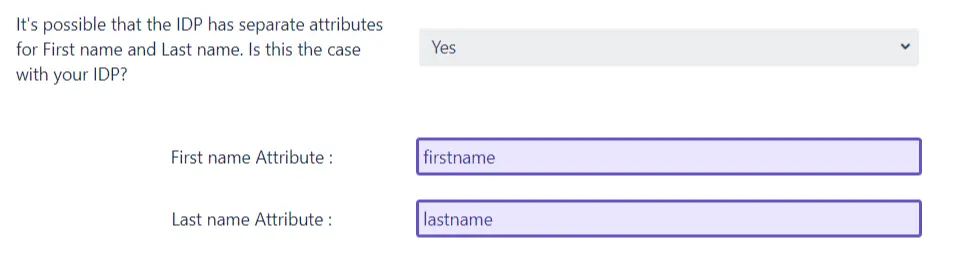
Again, as in the case of username and email input fields, if the Test action has been performed in the previous step, then the input fields will be dropdowns. The appropriate attribute name can be selected from the dropdowns.
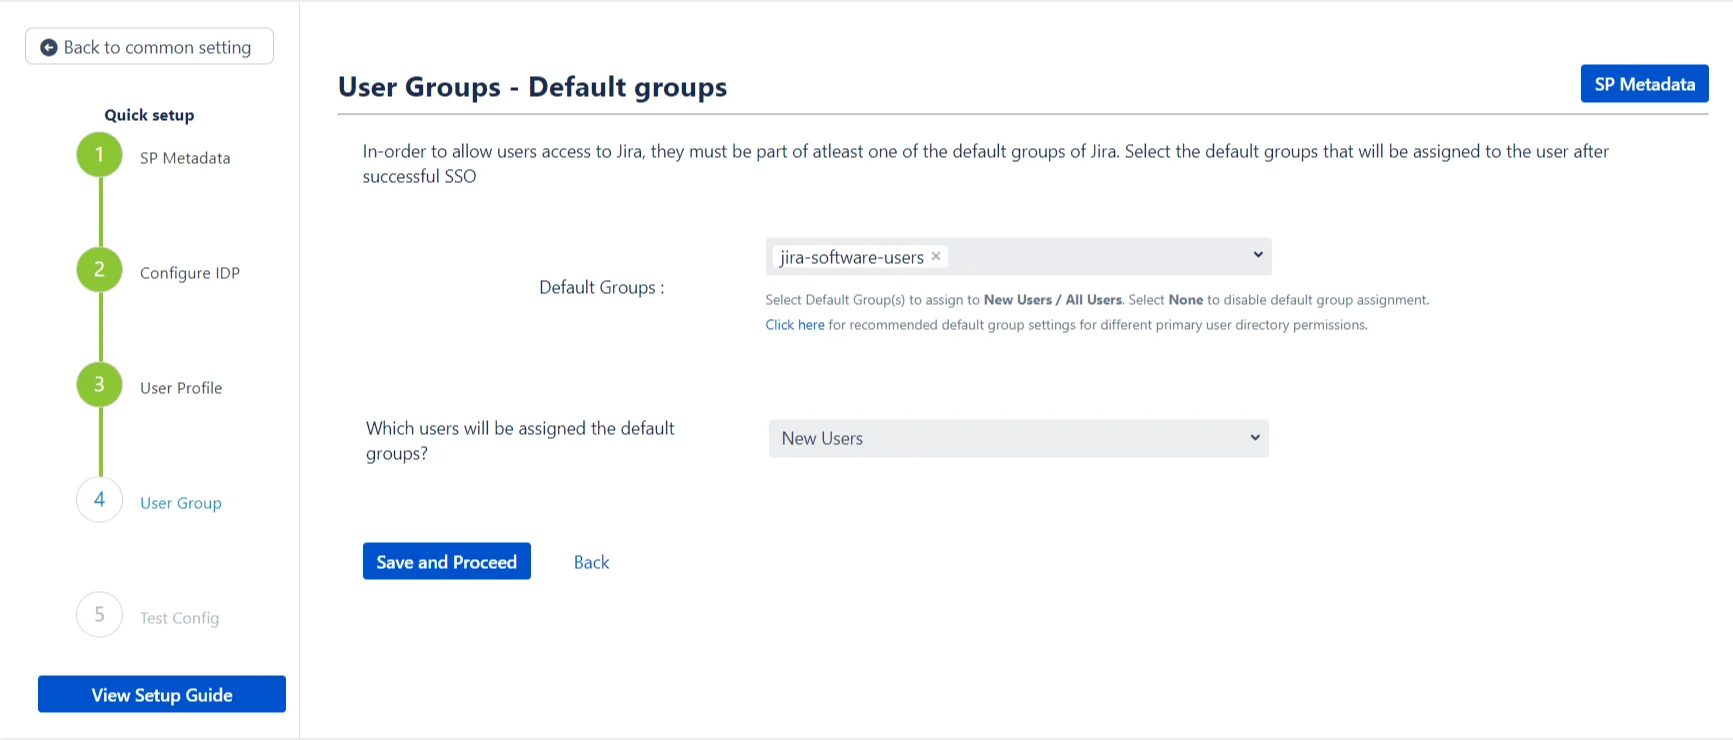
Step 4: User Groups – Default
In this step, the default groups are configured for all the users who SSO into SP using this IDP. These groups will be assigned to the user by default after successful SSO. This does not depend on the user’s IDP groups that are received from the IDP in the SAML response.
If you wish to configure the user’s SP groups based on the group information received from the IDP in the SAML response, you may do so by going into the advanced IDP settings.
Configuring the default groups
The default groups to be assigned can be selected from the dropdown provided. The dropdown will list all the groups that have been configured or added in the SP. It is possible to select multiple groups for this input field.

When will these groups be assigned?
The plugin provides the option to choose which type of users will be added to the default groups. The dropdown has the following options:
- New Users: Only new users performing SSO will be added to the default groups. Users that already exist in the SPs user directory will not be assigned to these groups.
- All-users: Every user is added to the default groups after successfully performing SSO.
- None: Select this option if you don’t want to assign any default group while SSO. The default groups are not assigned to any users logging in via SSO.
Step 5: Troubleshooting and Support
This step marks the end of the Quick setup process. If you’ve reached this step, then your IDP has been added successfully and basic SSO has been configured for your SP.
In case you’ve faced any issues during this process you can let us know by following the steps given in the Troubleshooting section. We will be happy to assist you.
Even though the IDP has been added, there are still many settings and configurations that you can try out and which could enhance your user’s SSO experience.
You can access these settings by going to the Configured IDPs page and using the Edit dropdown in the actions section of your IDP

Custom setup
If you want to customize your IDP setup from the get-go, you can use this setup flow. The Custom setup flow gives you access to all the various setup options that we provide to add a SAML Identity Provider. As with the quick setup, there are two ways you can add your IDP’s metadata. These methods are presented as separate tabs on the Custom Setup page.
1. Manual Configuration
In this method, you will get to configure each SSO endpoint by entering it in the provided fields. You will also be able to configure options such as whether or not the requests sent should be signed, the NameID format and the SSO and SLO binding type.
2. Import From Metadata
Most IDPs have the provision of providing their metadata via a metadata URL or file. If your IDP supports this, then you will be able to use this method to directly import the SSO endpoints into the plugin. The plugin supports both, metadata URLs and metadata files.
Once you import the metadata, you will be able to configure the same options that were provided in the Manual Configuration section.