How to Configure Role Mapping?
Basic Role Mapping
Applies to : Standard or Higher version
-
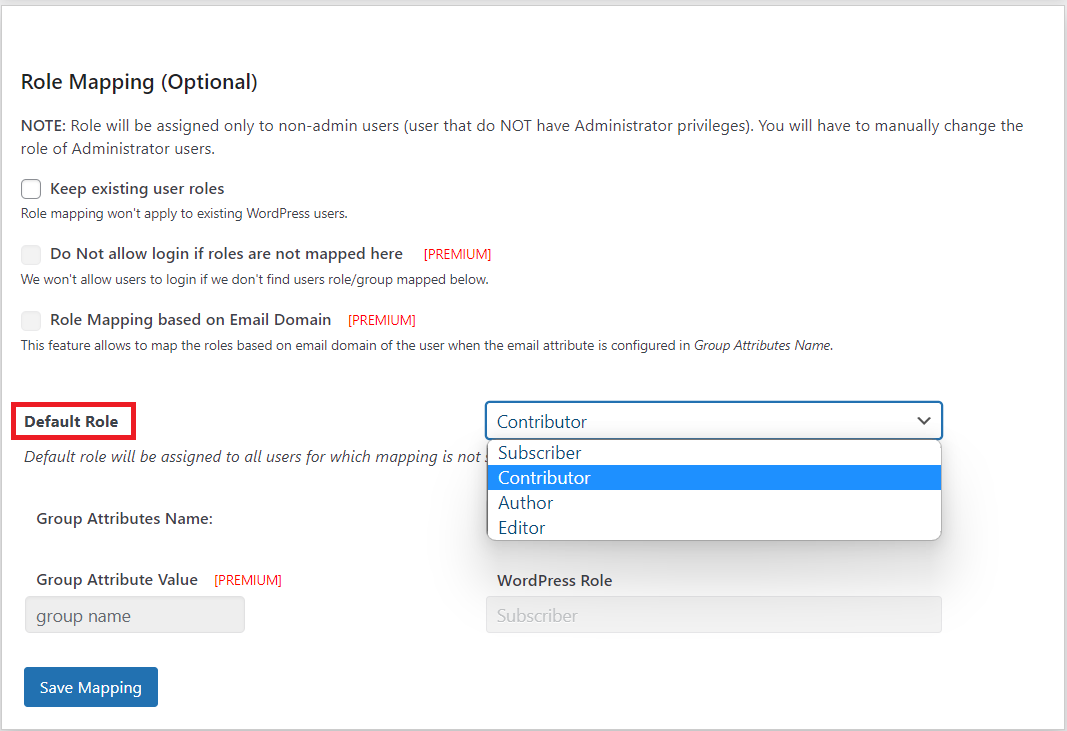
Enable Role Mapping: You can map any WordPress role as a default user role to the all SSO users for which role mapping is not specified.
-
Eg: From the below Screenshot the Contributor role will be assigned to all the SSO users who will be logging into your website.
Advanced Role Mapping
Applies to : Premium or Higher version
-
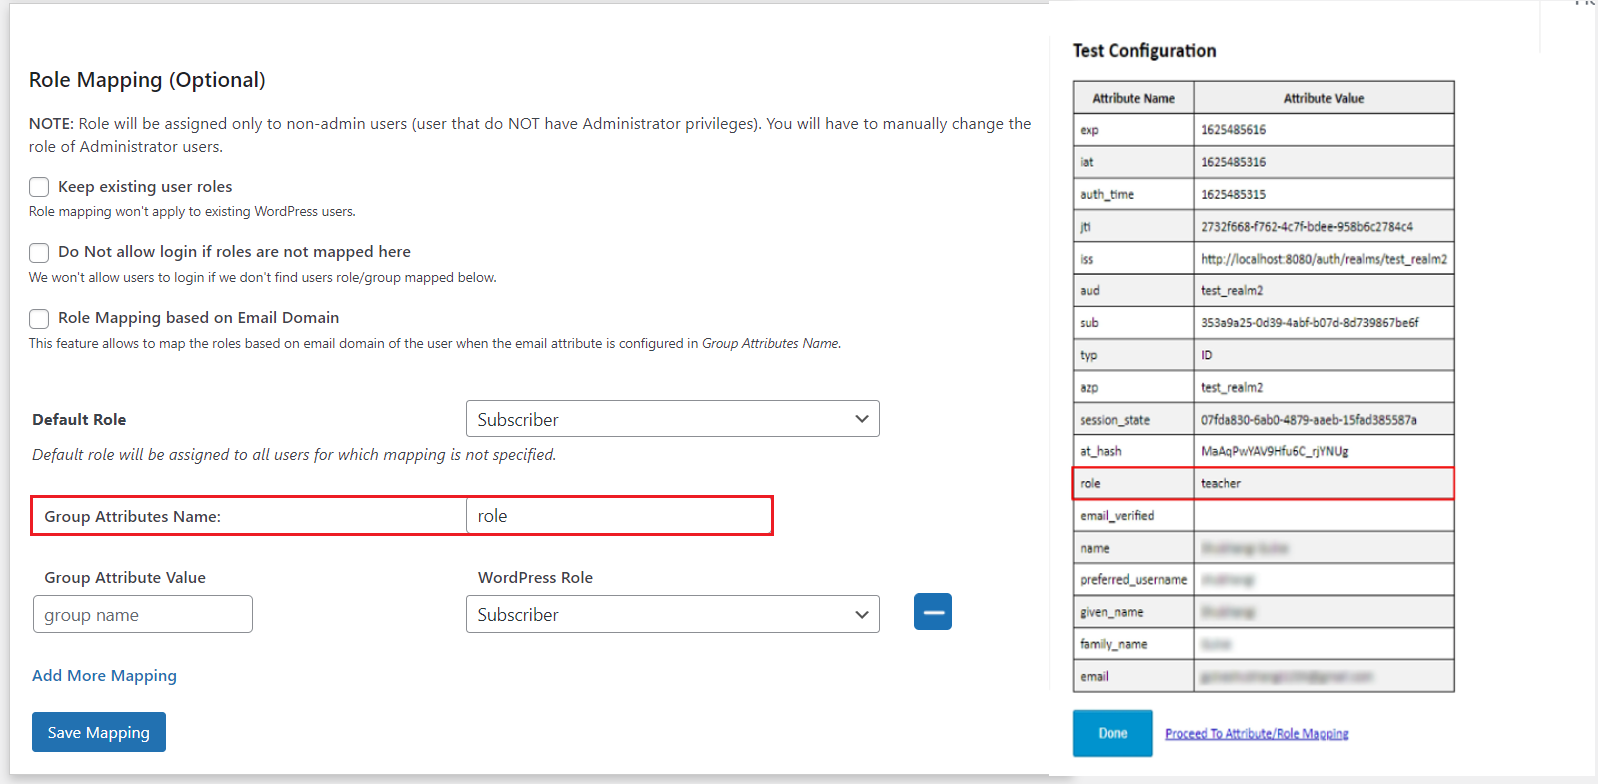
You need to map Group Attributes Name. Select the attribute name from the list of attributes which returns the roles from your provider application.
-
Eg: Role
-
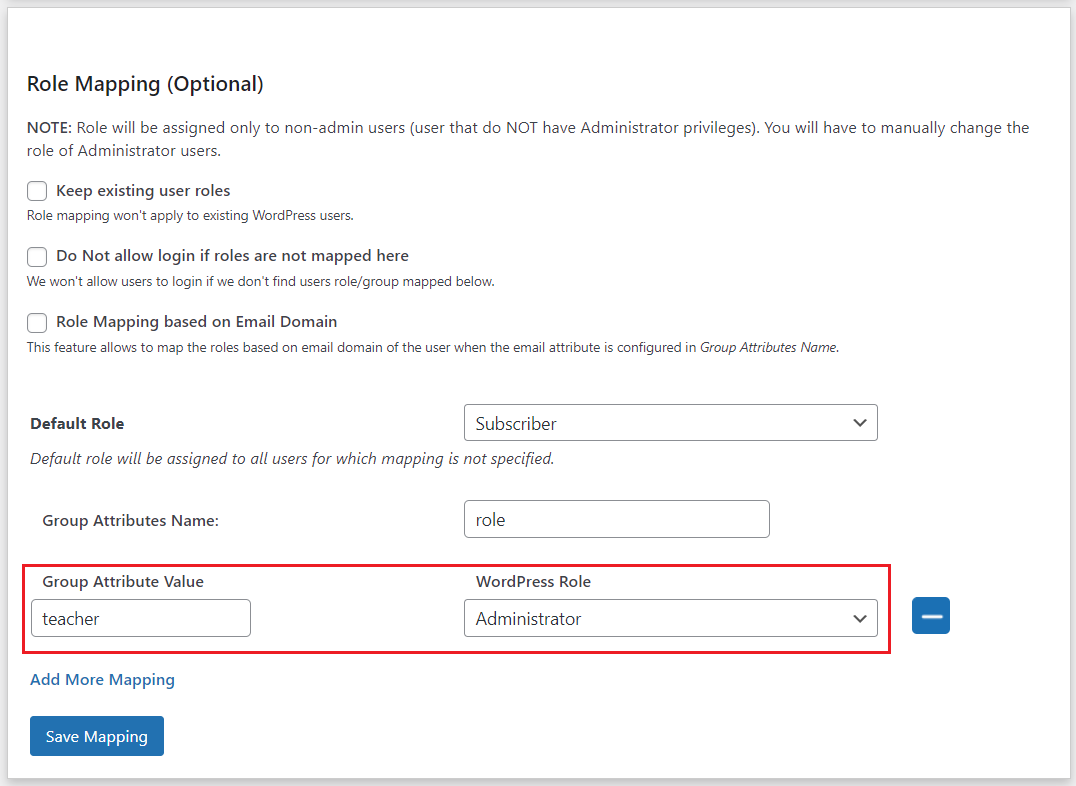
Assign WordPress role to the Provider role: Based on your provider application, you can allocate the WordPress role to your provider roles. It can be a student, teacher, administrator or any other depending on your application. Add the provider roles under Group Attribute Value and assign the required WordPress role in front of it under WordPress Role.
-
For example, in the below image. Teacher has been assigned the role of Administrator.
-
Once you save the mapping, the provider role will be assigned the WordPress administrator role after SSO.
-
Example: As per the given example, Users with role ‘teacher’ will be added as Administrator in WordPress and ‘student’ will be added as Subscriber.
Keep existing user role
This feature prevents role updation of the existing user after SSO. It means if the user already exists in WordPress, then after SSO, their old role will not be updated regardless of the role mapping done in the role mapping section of the plugin.
Do Not allow login if roles are not mapped here
This feature prevents the user from login if his role retrieved from the provider side does not match with the role as used for mapping in the role mapping section of the plugin.
Role Mapping based on Email Domain
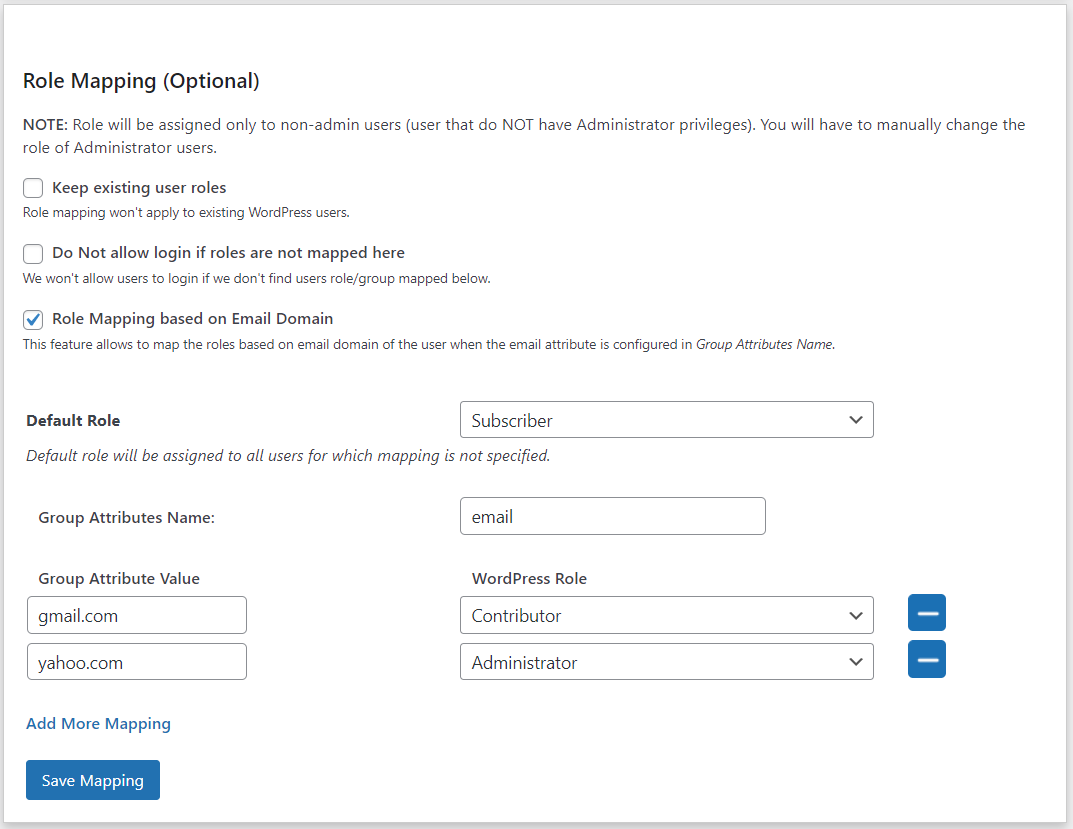
This feature allows to map the WordPress roles based on email domain of the user, when the email attribute is configured in Group Attributes Name.
- Eg:
Default Role
Default role will be assigned to all users for which mapping is not specified.
You can refer to this link for the same: https://faq.miniorange.com/knowledgebase/map-roles-usergroup/
SubSite-based Role Mapping
Applies to : Premium or Higher version
The Subsite-Based Role Mapping feature allows administrators to assign and manage user roles at the subsite level within a larger network structure. This functionality enables more precise control over user permissions and access to specific sites. This means you can create distinct role assignments for each individual site.
-
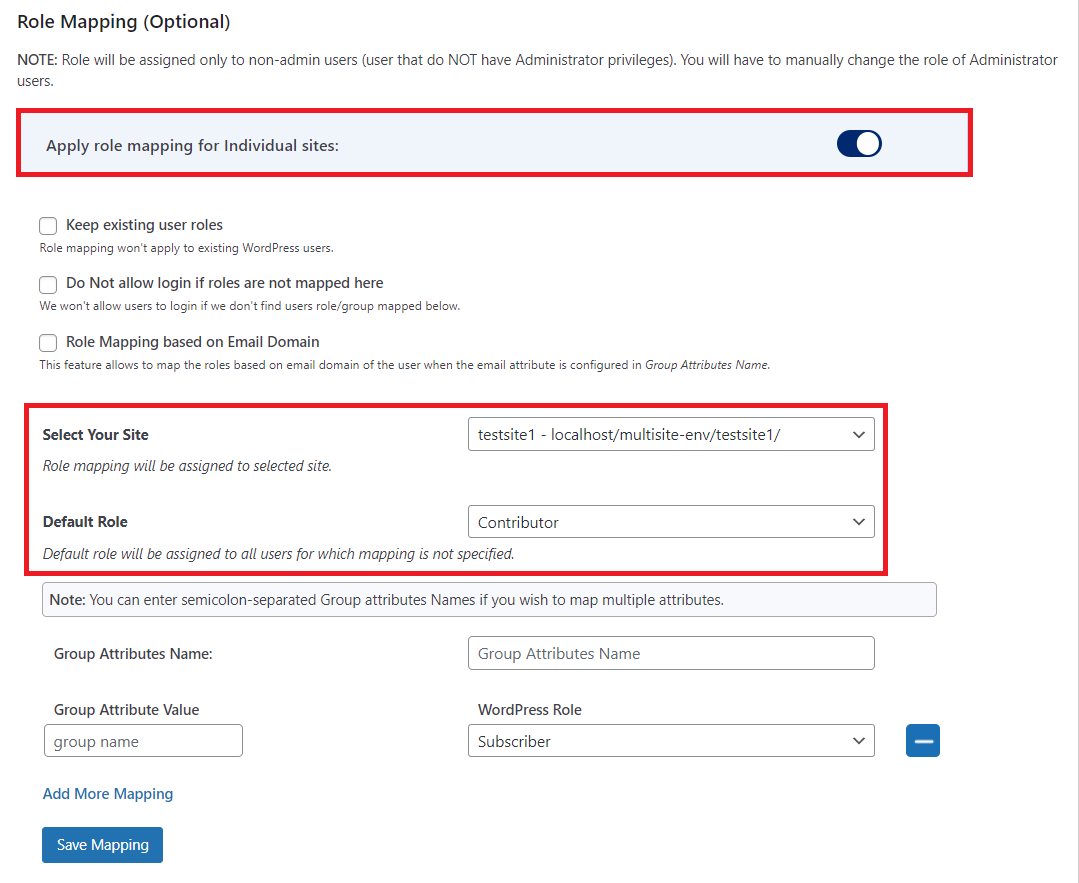
To activate this feature, enable the “Apply role mapping for individual sites” toggle. This option allows you to select the specific site for which you wish to configure role mapping.
-
Once you select the site, apply the role assignment. For example, as shown in the screenshot below, the Contributor role will be assigned as default to all SSO users accessing Site1(i.e. testsite1).
-
In the same way, you can select different subsites and assign the default role to each of them.
Advanced Subsite-based role mapping:
-
Here you can add mapping and assign roles based on IDP attributes to individual subsites.
-
Go to the role mapping settings and ensure that the Apply role mapping for individual sites toggle is enabled. This will allow you to configure role mapping for specific subsites within your network.
-
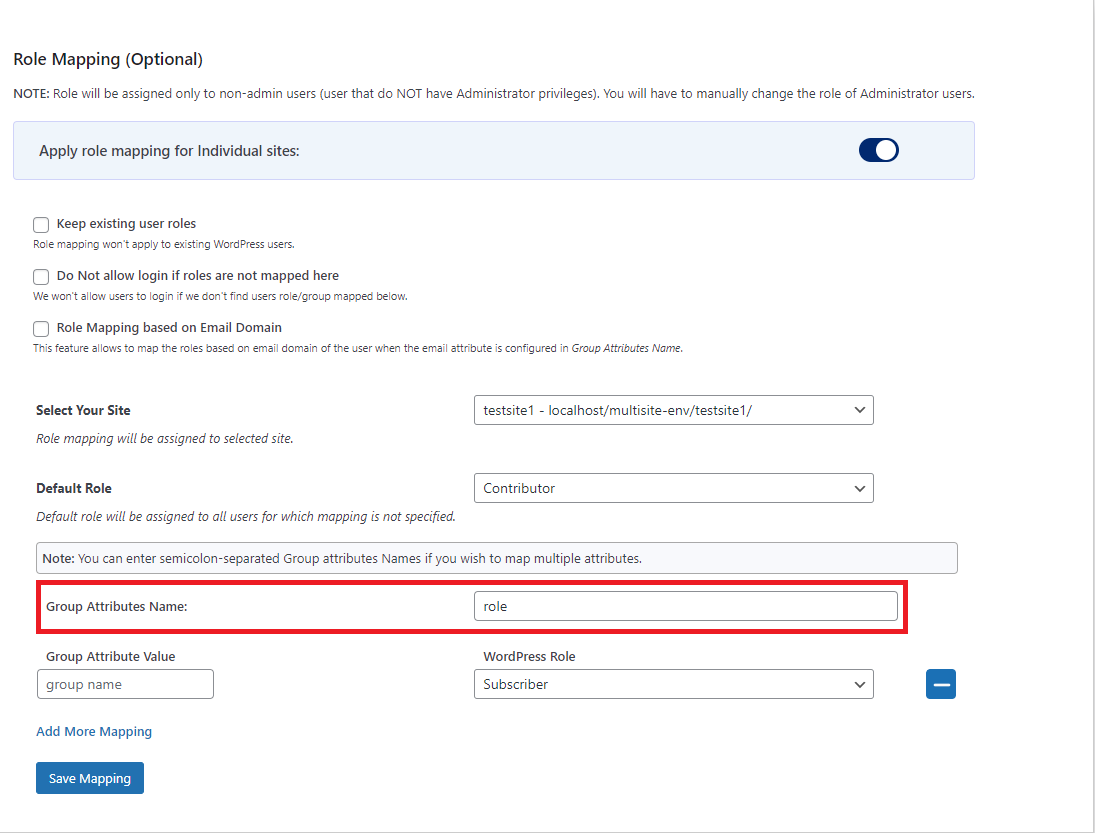
Select the group attribute name from the list of available attributes provided by your identity provider (IdP). This attribute is used to fetch the roles assigned to users in your provider application (e.g., "role").
-
Under the Group Attribute Value, enter the value returned by your Identity provider corresponding to the group attribute name(e.g., "student," "teacher,"). Next, assign the corresponding WordPress role for each provider role by selecting the appropriate option under the WordPress Role column. For example, in the below image. For testsite 1, a teacher has been assigned the role of contributor, and a student has been assigned the role of subscriber.
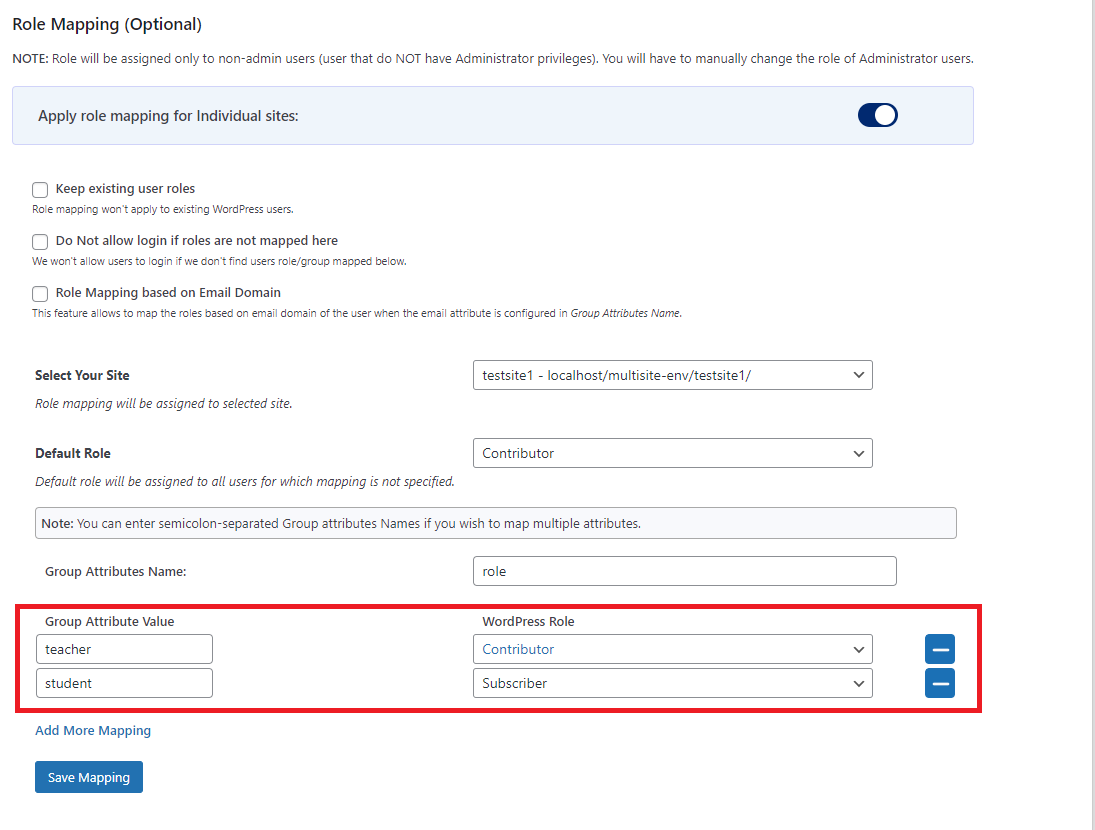
Once you save the mapping, the provider role will be assigned the WordPress role after SSO.
-
Now, if you select the Subsite2 to configure the role mapping. You will see the role mapping is set save new mapping for Subsite 2.
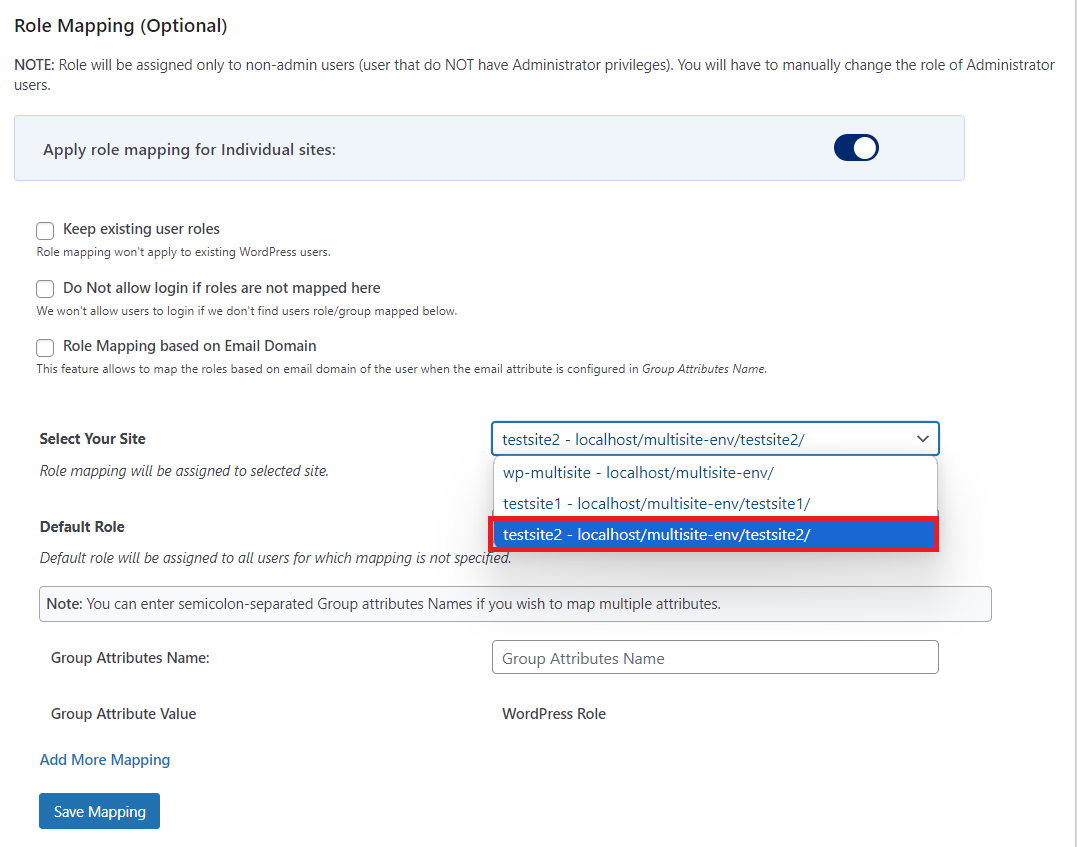
-
Select the group attribute name from the list of available attributes provided by your identity provider(e.g., "group").
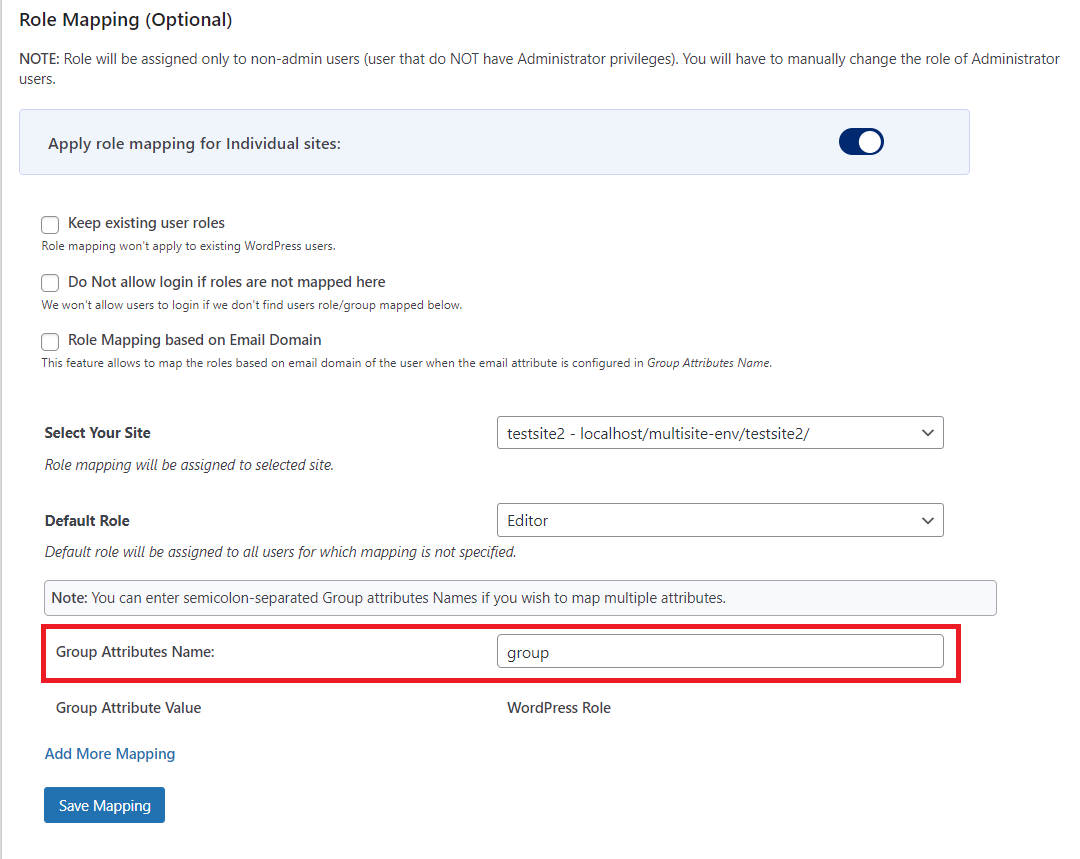
-
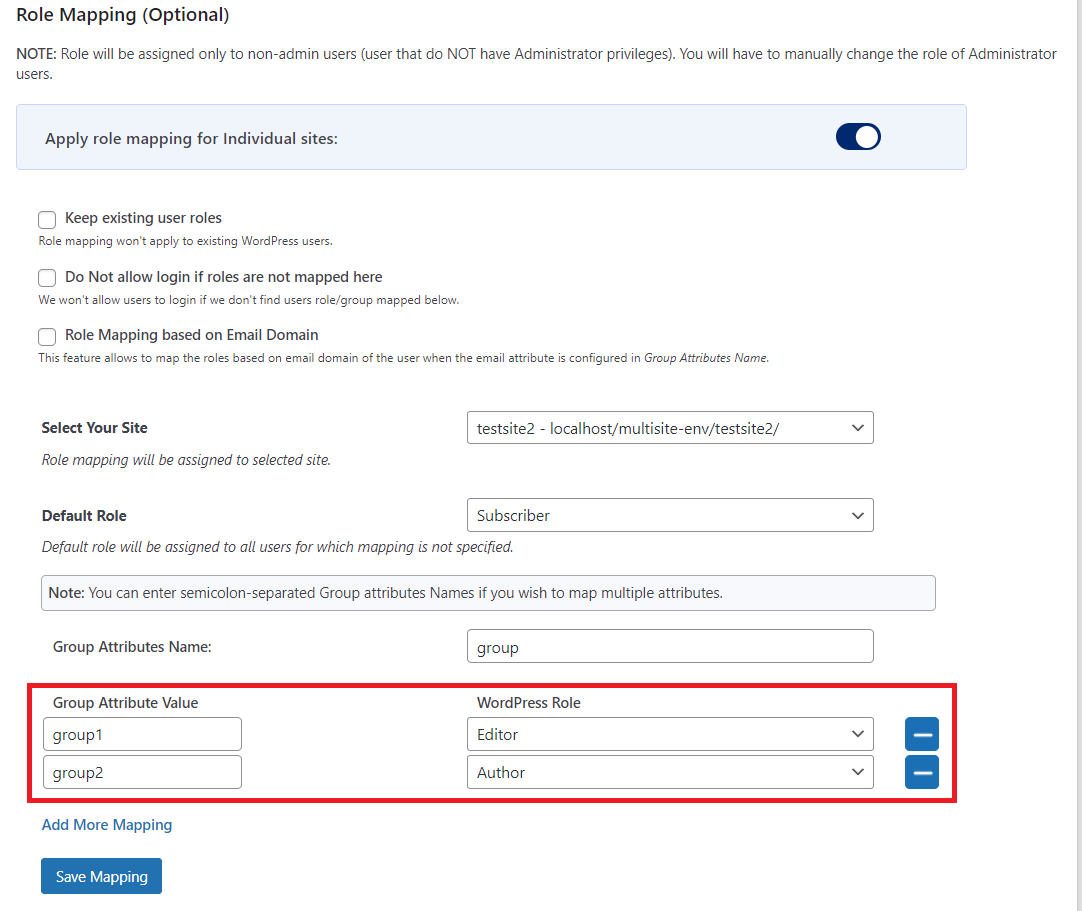
Now, assign the corresponding WordPress role for each provider role by selecting the appropriate option under the WordPress Role column. For example, in the below image. For test site 2, users from Group 1 have been assigned the role of Editor, and a user from Group 2 has been assigned the role of Author.
-
Once you save the mapping, the provider role will be assigned the WordPress role after SSO as per your configuration for the site.
In conclusion, the advanced subsite-based role mapping feature allows you to assign specific user roles for each subsite in your WordPress multisite network. For example, in Testsite 1, we mapped roles like "teacher" to "Contributor" and "student" to "Subscriber," ensuring users get the right permissions after SSO. This tailored approach guarantees secure and appropriate access across your entire network.
Super Admin Role Mapping:
The Super Admin Role Mapping feature allows you to grant Super Admin access to users based on their attributes from the identity provider (IdP). This ensures that users with specific attributes from the IdP can be granted the highest level of access and control over the WordPress multisite network. Unlike the regular Admin role, which provides control over individual sites within the network, the Super Admin role grants network-wide permissions, allowing users to manage all sites, settings, and configurations across the entire WordPress multisite setup.
How to Configure Super Admin Role Mapping:
-
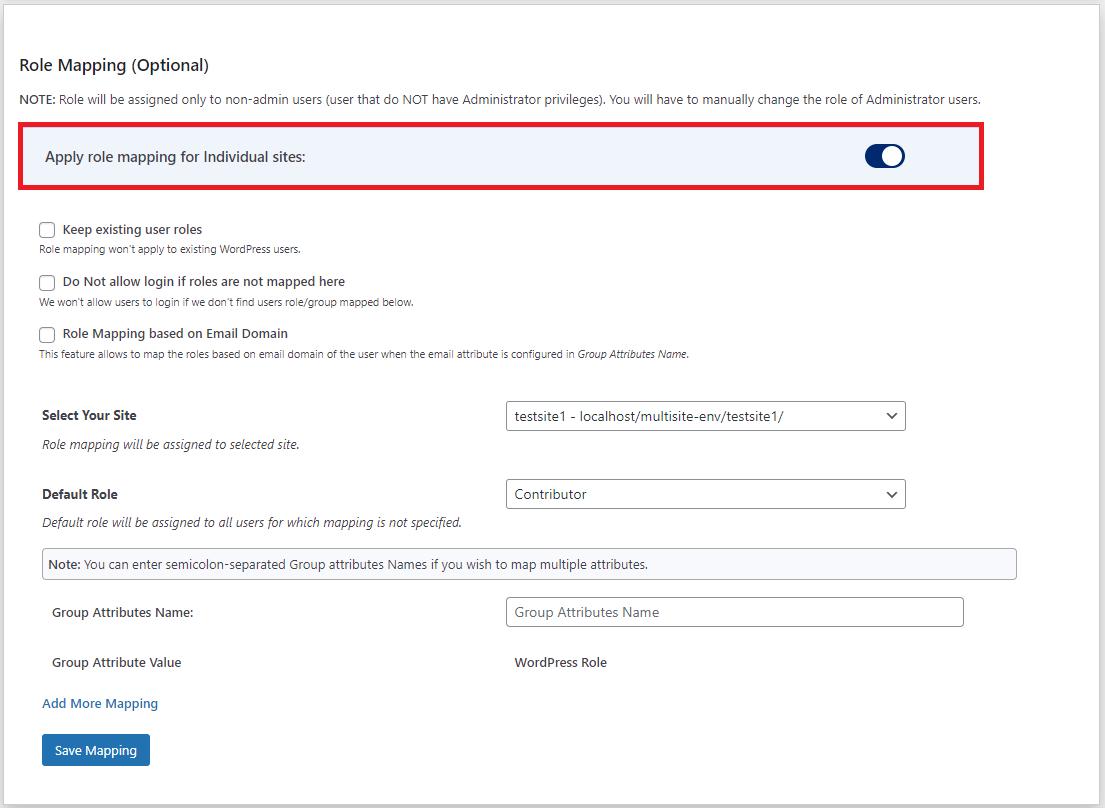
Go to the role mapping settings and ensure that the Apply role mapping for individual sites toggle is enabled. This will allow you to configure role mapping for specific subsites within your network.
-
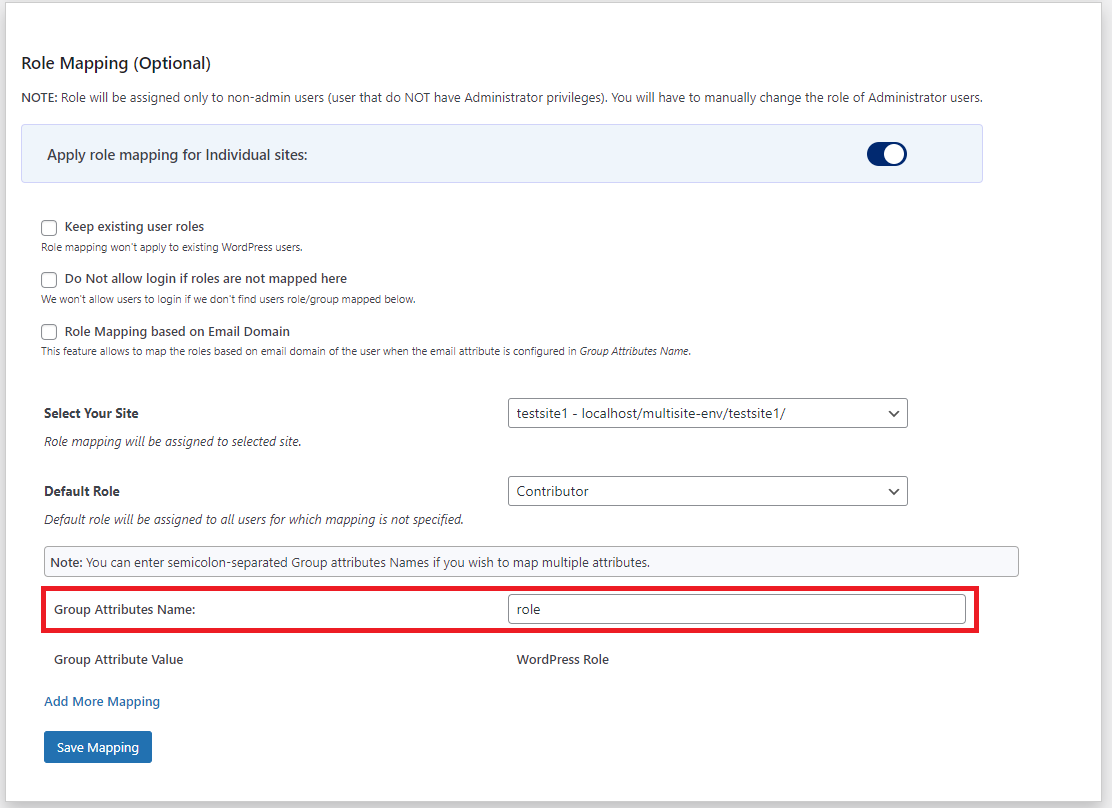
Once you select the site, choose the group attribute from the list provided by your IDP that will be used to identify users who should be assigned the Super Admin role (e.g., "role").
-
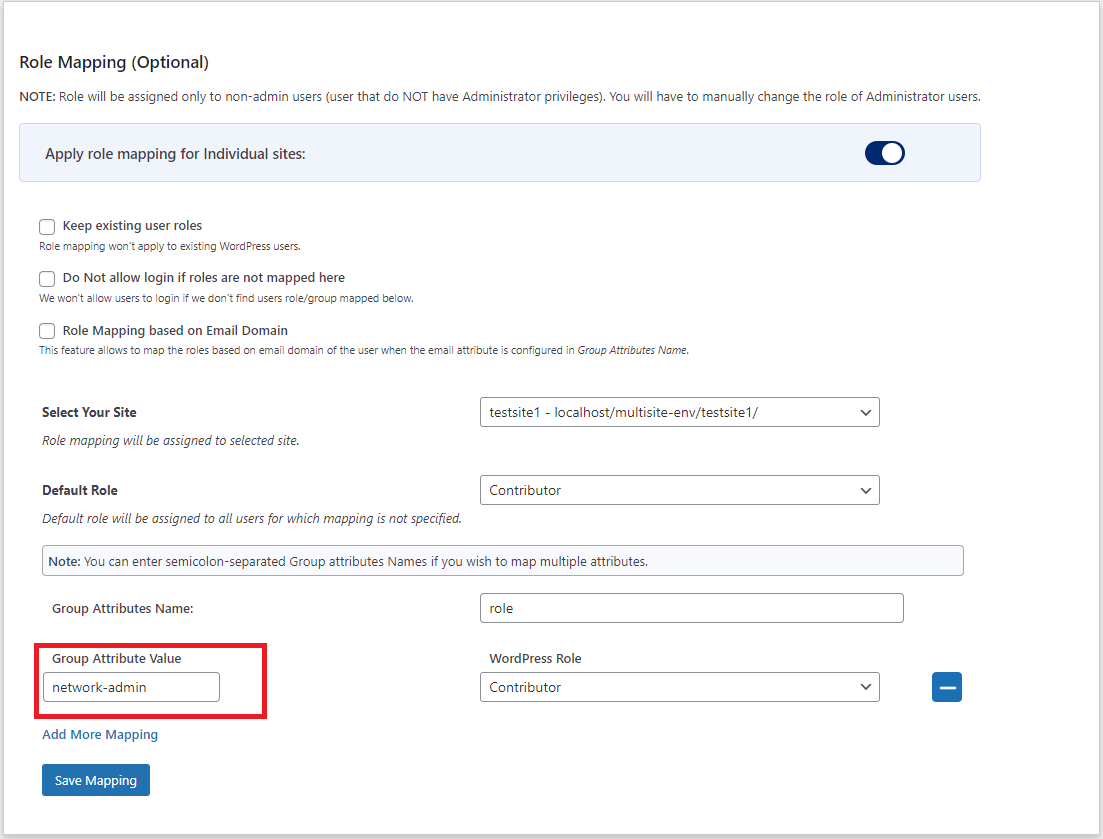
Add Provider Role for Super Admin Assignment: Under the Group Attribute Value section, enter the attribute value returned by the IdP that represents the role you want to map (e.g., "network-admin," "superuser").
-
Assign the WordPress Role: In the WordPress Role column, select Super Admin.
Example: As shown in the image below, if the attribute value returned by the IdP for a user is "network-admin," they will be assigned the Super Admin role after SSO.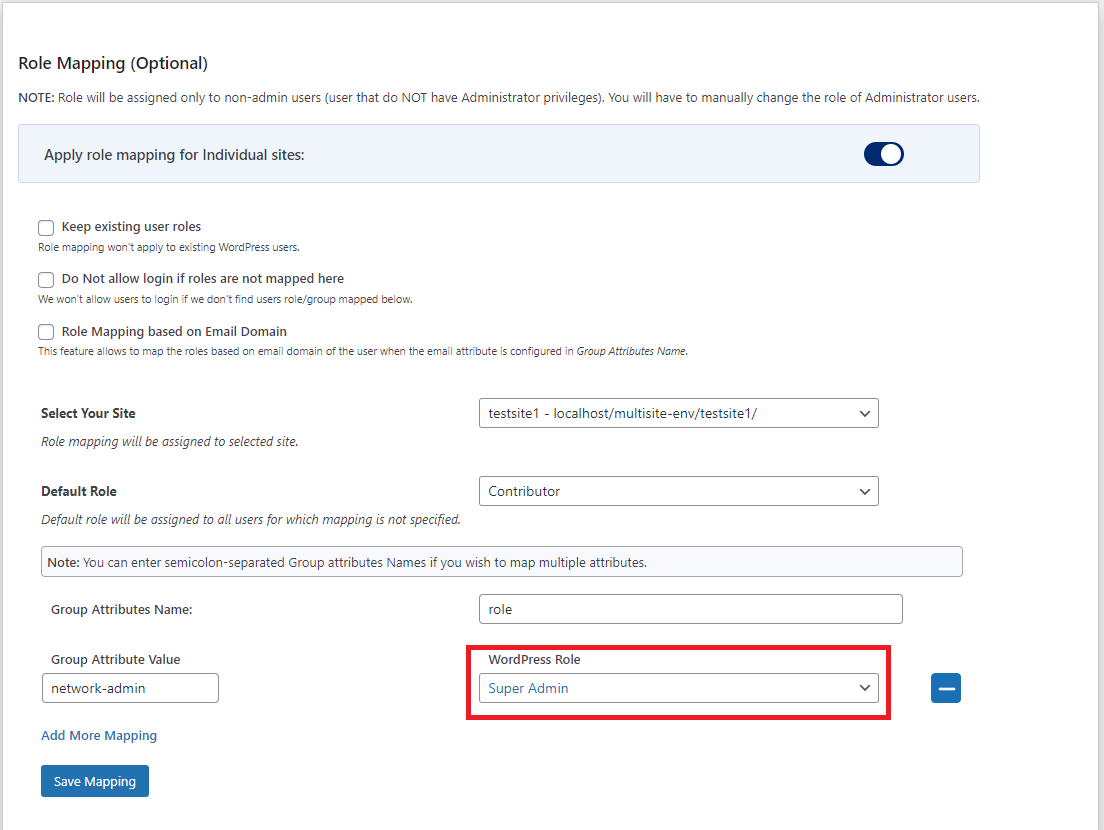
Once you save this configuration, any user with the specified IdP attribute value will be granted Super Admin access upon login.